Car plastic painting a great way to transform worn parts of the exterior and interior of a car, as well as giving them a new color and shine. Most often, car enthusiasts will do it, due to the fact that car painters do not want to mess with plastic small things (especially if these parts are half a bag)), or they overestimate the price for their work, but everyone wants to save. Therefore, in this article we will analyze how cheap, independently and efficiently do-it-yourself car plastic paint in garage conditions.
The technology for preparing a plastic surface is absolutely the same for both painting from a cylinder and from an airbrush. The only difference is what you will spray paint from.
The most important thing when doing painting works, is patience and accuracy. If you have these two qualities, then you can easily paint any part of the car yourself.
What you will need:
1. Can of car paint. I want to note that to pick up a cylinder with desired shade, and even with 100% coincidence is simply not possible! But there is a solution! Now in many specialized stores for the sale and selection of auto enamels, it is possible to “fill” the balloon with the desired shade, which can be picked up there. To do this, you need to remove any part from the car and give it to the colorist. Most often, this is the gas tank hatch, since it is rarely painted and, accordingly, the percentage of hitting the color increases. Well, or you can, for example, pick up paint by code. It is on almost every car, only located in different places. Basically, it's a small aluminum plate affixed to the engine bay. It looks like this:

2. Primer for plastic ("Velcro").
3. Acrylic primer. The color must be selected based on the shade of the part. If the detail is dark, then it is better to buy a black primer, because, firstly, this way the paint will cover better, and secondly, chips will be less visible.
4. Clear varnish.
5. Sandpaper, grit P 240, 320, 600, 800, 1000, 2000. “Wet!” Let me explain. There are two types of sandpaper: “dry” and “wet”. There is no point in using them the other way around. If you want, you can try and see why.
6. Degreaser (Anti silicone).
7. Napkins or cloth to remove dirt.
8. Accessories for car polishing (wheels, paste, etc.). This is only necessary if there are any kosyachki on the varnish.
Stage 1 - preparation.
At the stage, we dismantle from the car all the parts to be painted. Now, touching on the issue of surface preparation, I will say that everything here is strictly individual for each detail, but still I will try to voice all the points that you may encounter when painting plastic.
For example, you buy a door molding at a car dismantling, which of course needs to be painted.
Option number 1

This molding is from a cheap car equipment, on which such elements as: mirrors, door handles, plugs, moldings and much more, “go” not painted.
With painting such a part, you will have to tinker a little longer and spend a little more materials. I will describe the process a little later.
And option number 2

This molding is from the car in the "normal" configuration. It's already painted silver. If the surface of the part does not have scuff marks and scratches, then it is enough to matte the surface with sandpaper, grit R 800-1000, or you can use gray scotch bright. Then we apply paint and varnish.
As you can see, the detail in the second case is much easier, since we skip the priming process.
There are still cases when the paint begins to peel off, or there are any deep scratches, dents and other defects. Here you can no longer do without rough sandpaper and putty.
2nd stage - priming.
The types of soils used directly depend on the quality of surface preparation. A little higher, we sorted out the options for details. In the first case, we need Velcro primer, which is applied directly to the plastic. Previously, before this, it is necessary to matte the surface with sandpaper P 600 - P 800 or gray Scotch Bright. The primer is applied with a spray gun, or you can use an aerosol can. Dries within 10 - 15 minutes, after which you can apply car enamel. This information is general and does not apply to any manufacturer. Therefore, I advise you to pay attention to the instructions before applying. Yes, and one more thing. Primer for plastic is produced mostly in a transparent color, so there are difficulties with spraying, either too much in one place, which leads to smudges, or in some places there is none at all. The solution is simple, prime in a well-lit area, and another option is to look for a silver-filled primer, which is especially useful when priming large parts, such as a bumper. Just do not try to add any filler to the soil on your own.

Where to use acrylic primer?
Now the question is brewing, is it necessary to apply acrylic primer to the Velcro ground ?! The answer yes or no also depends on the surface of the part. If the plastic part does not have mechanical damage (seizures, scratches, abrasions, cracks), then it is enough to apply only a primer on the plastic. Well, if the part was polished with coarse abrasives, then to hide the risks, it is necessary to apply acrylic primer.
The color of the primer depends on the color of the part. If, for example, the detail is dark, then it is better to use black primer and vice versa.
Acrylic primer is best applied in 2-3 layers, while it is necessary to do an inter-layer exposure, about 3-7 minutes. Otherwise, the soil may leak.
In my article, it is described and shown in great detail how to paint a new plastic part.
After you cover the repair part with acrylic primer, it must be left for a while to dry completely. Drying time is indicated on each can of material. But I advise you not to rush, and if the time is 3 hours, then it is better to start rubbing the soil after 6 hours. Usually we prime the parts and leave them overnight. Arriving the next day, the soil will probably already be ready for processing.
3rd stage - mashing the soil.
Primer on plastic (“Velcro”), does not need mashing!!! You can apply paint on it immediately after drying. But acrylic primer requires some processing (washing).
To "wash" the soil, we need a bucket with warm water soapy water, of course, it is not necessary to add soap there, but it is still recommended to do this, since sandpaper clogs less.
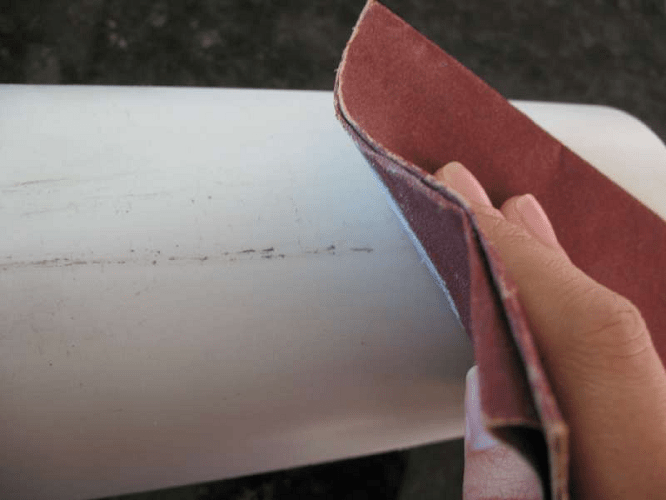
We will definitely use sandpaper “wet”. In one of my articles, I wrote that there are wet and dry sandpapers, their scope directly depends on the name, but not in any case on the contrary !!!
There is a huge number of sandpaper manufacturers, but of all, I would recommend using Sia (See the figure below), as it has proven itself very well. I do not impose this manufacturer on you and you may like a completely different paper to work with.

How to understand that the surface is worn?
It is necessary to overwrite until the surface becomes absolutely smooth, while constantly moistening the sandpaper and the part with water, since sandpaper “wet” does not like it when it is dried dry (so you just don’t rub anything, Yes, and still do a bunch of scratches that will be visible when painting).
After you have made sure that the surface is ready, the part must be thoroughly rinsed with water to remove soil dust from it.
4th stage - painting the plastic of the car.
Perhaps the most pleasant moment has come, after such a long and tedious work, this plastic painting.
Painting takes place in two stages:
1. Paint application
2. Lacquering
Although this option is not always the case, for example, varnishing is not required for acrylic paints (1-k).
Lacquer should be applied after 15-30 minutes, after applying the last coat of paint. The varnish is more liquid, so do not pour too much, otherwise you will make smudges that will be very difficult to remove on the radiator grill. On the flat surface make it much easier.
The first layer of varnish should be applied drier, so it will better cling to the surface and will not smudge. We apply the second layer to the “spill”, trying to lay it without shagreen (just do not overdo it, otherwise you will make smudges). If you have no experience at all in painting with a balloon or spray gun, then initially it is better to practice on some unnecessary detail.

Moldings painted and ready to install. When painting such parts, be sure to pay attention to the ends, which will be very clearly visible when installing the part on the car.
Now there are no more “cheap” plastics on the car and visually, the equipment of the car has become higher))
I hope that this short article about painting the plastic of a car will help you refresh the boring gray parts of a car on your own.

If you have any comments feel free to leave them below.
What do you need to paint plastic at home?
How to paint plastic at home?
Step by step instructions for painting plastic
Step_1 Clean the plastic surface from dirt with a sponge (brush) and soapy water. If dust and dirt remain on the product, the paint will lie unevenly and the product will have to be repainted. Strong pollution, mold and erosion can be washed with bleach. Dry the plastic product well before starting work.
|
Step_2 To degrease the surface, wipe it with a solvent or white spirit, then wash off the applied composition and dry the product thoroughly. Step_3 To create a porous structure, sand the surface with fine sandpaper or special grinder. Grinding will allow the paint to lie perfectly evenly, due to the bonding of the paint and the porosity of the surface. After sanding, the surface will become matte. Properly selected sandpaper will not give the product unwanted roughness, so it is better to choose sandpaper with a grit of no more than 180. Be sure to remove sanding dust. |
 |
Step_4 Before painting the plastic at home, glue the places that are not subject to painting with construction tape and remove it immediately after the work is completed.
Step_5 Now you can start painting the plastic with spray paint. Shake the spray in the can for at least 30 seconds, spray the spray paint from a distance of 20-30 cm from the surface. You need to put the paint in smooth uniform movements. After the first layer has dried, which will take 15-20 minutes, apply subsequent layers of paint. When painting plastic, it is recommended to apply at least 2 - 3 layers of paint.
Step_6 After the spray paint dries, apply varnish in the same way and wait for it to dry. Complete (final) drying takes at least 2 - 2.5 hours. The product is ready to use!
What to pay attention to when painting plastic?
As we have already said, plastic is different type, so it is recommended to carefully approach the choice of paint. Ideally, you need to use a special paint for plastic.
5 In addition, please note that for aerosol paints in cans there are special tips for convenient regulation of the amount of sprayed paint and its uniform distribution.
We talked about the most simple and efficient way painting plastic at home using spray paints, however, this procedure can also be carried out with a regular brush with a brush using canned paint.
How to paint plastic at home with a brush?
Painting plastic objects with a brush is somewhat different from the method described above and has its own advantages and disadvantages. One of the features is long term drying, which means that the product must be completely isolated from dust on the freshly painted surface, which is not so easy at home. That is why the brush painting method is used for painting objects that do not require special attention. The technology for painting plastic with a brush at home is quite simple and essentially repeats the process of working with spray paint:
Step_5 This extra step. If you want to further protect the painted surface, you can apply acrylic varnish. Apply varnish ONLY to completely dry paint. In the case of aerosols, we know that the paint takes 15-20 minutes to dry, but here everything will depend on what kind of paint you use. Lacquer drying time 2 - 2.5 hours
What should I pay attention to when applying paint on plastic with a brush?
1 Apply the paint in a thin layer, constantly pressing the brush against the surface
2 When taking the paint on the brush, do not dip the brush into the paint completely
3 Take into account the coloring angle - it should be the same.
4 For even coverage, apply paint material wide streaks so that the paint fills the pores, and then carefully blend the applied layer.
So, we talked in detail about how and how to paint plastic at home. Feel free to start painting and make sure from experience that it is not at all difficult, and the result is worth the time and effort spent!
If this article was useful to you, please rate it (at the top of the page). Thanks!
Visitors to this page most often choose in the online store:
Need to repair or repaint decorative coating on plastic parts and PVC cladding occurs much more often than it might seem at first glance. It could be the surface plastic windows verandas, buildings home appliances, soft inflatable boat, plastic elements body kit on the car and even protective fabric covers. Paint PVC plastic does not represent special work, but under one condition, if there is a special paint for PVC.
Difficulties in painting, how to paint PVC correctly
For coloring plastic, acrylic or acrylate paint for PVC profiles is used. As a rule, due to the high gloss or the specific “oily”, paraffinic texture of the PVC surface, ordinary acrylic paint on plastic lays very poorly, rolls off in drops. Even the classic method of increasing paint adhesion by applying artificial roughness does not improve adhesion to the substrate.
Therefore, before attempting to apply paint to the window frame or plastic hinged parts, it will be necessary to thoroughly prepare the PVC surface:
- On the eve of using the paint, the PVC surface is cleaned of dust and dirt with soapy water and washed with clean water so that no traces remain. Ideally, a detergent for PVC parts is best, but you can also use water solution isopropyl alcohol;
- The surface is treated with a special solvent-activator that improves the adhesion or adhesion of the paint to the smooth PVC profile;
- If acrylic paint is used for painting on water based, PVC plastic can be lightly moistened with a hand spray gun, and then applied with a brush or airbrush.
Important! It should be borne in mind that the quality of the painted surface depends primarily on temperature and humidity. The higher the temperature environment, the better the adhesion, and the faster the drying speed.
After about a couple of hours, the paint applied to PVC at a temperature of 20-23 ° C will stop sticking to the hands, and after 26-40 hours the drying process of the painted surface will be completed completely.
Water-soluble acrylic paints allow you to get the painted PVC surface of the most different colors and shades. According to the paint manufacturers, the tinting machine, which is used for tinting and color correction, can produce more than 2,000 color compositions.
Technology for painting household items made of PVC
The high quality of the painted surface can only be obtained by using specially designed products for painting PVC surfaces of any modification. More simple materials, for example, frames and cladding of metal-plastic windows, can even be painted acrylic materials, but to obtain an exemplary glossy surface, a paint containing modifiers and a polyurethane varnish is required.
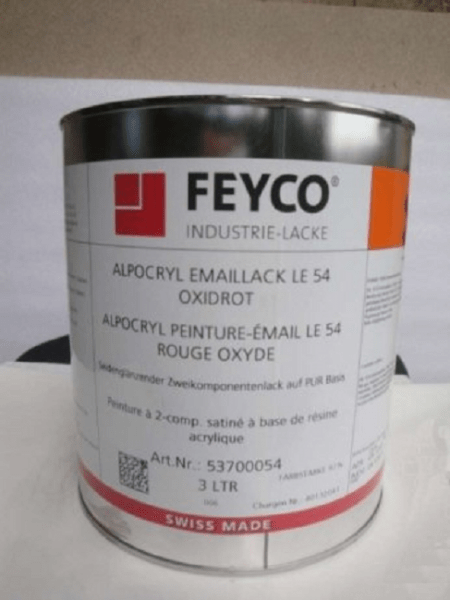
Therefore, to obtain a high-quality, perfectly smooth PVC texture, the following are most often used:
- Polyurethane paints and varnish compositions from Feyco AG, Switzerland;
- Acrylic urethane paints "PaliPlast RP Base" used for industrial painting pvc plastic.
For your information! Painting compositions "PaliPlast" are produced both on a water basis and on a varnish basis.
Despite the fact that, after drying, PaliPlast water-borne compounds are not washed off with water and withstand repeated washing of windows and frames, it is necessary to periodically restore protective layer using varnish, for example, "PaliPlast RP 022 Varnish".
Painting PVC plastic surfaces at home
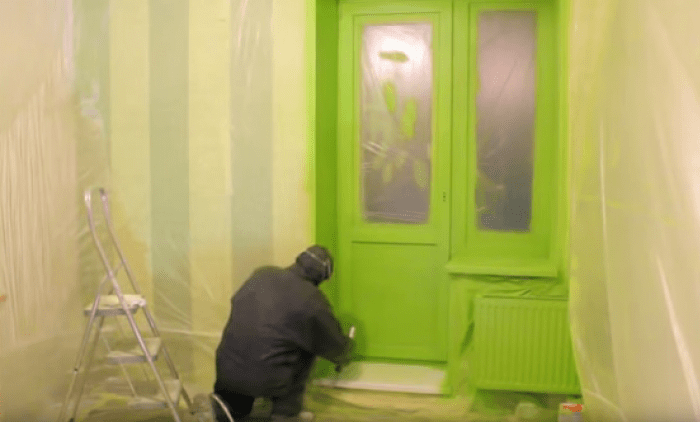
The most demanded procedure for painting PVC plastics is the painting of frames of metal-plastic windows. Not everyone likes White color standard PVC cladding, or the owners want to make the windows of their shop or showroom more expressive, in any case, the coloring of the windows is not difficult if you use PaliPlast RP Base PVC materials.
It will only be necessary to seal the window, slopes, glass and rubber compressor frames with polyethylene film masking tape, and you can start staining according to the method described above. The easiest way to paint PVC profile brush or roller, but best quality obtained when using a spray gun low pressure. The viscosity of the paint is low, but the presence of mineral fillers can sometimes lead to clogging of the nozzle or poor spraying, so the paint solution must be cleaned of films and thoroughly mixed before use.
More difficult is the coloring of decorative and protective elements PVC plastic on the car. Most often, these are moldings and linings inside the car. The size of the parts is small, so it is best to use spray cans to paint PVC plastic. The composition includes an activator and a solvent that provide good adhesion to plastic and rooted drying of the applied layer.
It is possible to paint small PVC parts both with preliminary dismantling from the car interior, and directly inside the car. In the latter case, you will need to install a fan to carry the aerosol flow out of the passenger compartment and make an apron from polyethylene film, which will close the space around the PVC part to be painted.
Full-sized PVC parts must be dismantled, dusted with alcohol or window cleaner, and then spray-painted in thin layers, 50-70 microns thick.
Difficult options for coloring PVC plastic
Large parts of the body kit or spoilers can be painted with a spray gun or spray gun. Initially, you will need to mat the surface with thick paper and micron-sized abrasive powder. Next, the plastic is thoroughly washed and dried.

Before applying paint, the surface will need to be wiped with a PVC cloth moistened with P646 solvent, and can be painted. If the thing is very thin and soft, then the first layer is best done. polyurethane varnish"Feyco", after which you can apply required amount layers of paint.
PVC pipes, structural frames, even glass and furniture can be painted in a similar way. In order to enhance the adhesion of the paint to a completely smooth and inert glass surface, Feyco proposes to add a special Fey (N) Vetro Zusatz 501 reagent to the paint. Polyurethane and epoxy compounds can be quite easily painted on metal, stone, plastic, wooden surfaces, while the quality of adhesion to the base is much higher than that of acrylic and water-dispersion materials.

Separately, it is worth mentioning the painting of soft PVC fabrics, for example, covers or cases inflatable boat. Majority polyurethane paints can be used for dense PVC fabrics under one condition. Staining is carried out using a barrier subcoat of a 1:3 solvent-diluted FEYCO Universalprimer 2159 primer, with the addition of Fey (N) Vetro Zusatz 501. The sublayer is applied with a spray gun in a thin layer of 20-25 microns. Subsequent painting is carried out with conventional polyurethane paints.
If there is no particular desire to look for optimal recipes for staining soft tissues, a barrier layer can be made using spray paint for cars.
Conclusion
Staining PVC is not enough challenging task if the right materials are used. Considering high durability PVC plastic, the demand for special paints for decoration or repair is only increasing, so the coloring technology is improving, and, apparently, in the near future the problem with painting PVC plastic will be finally resolved.
Plastic things are constantly found in everyday life, because this material is environmentally friendly, cheap, strong and durable. But, despite its strength characteristics, under the influence of the environment, plastic fades, becomes covered with cracks and scratches. To restore the decor that has lost its appearance or to give the material additional protection, plastic paint is used.

Areas of use
The range of use of dye for plastic is quite wide, but most often it is used:
- For painting dashboards of boats and cars. Painting panels is necessary not only for the purpose of decoration, but also to give them additional strength. This is especially true for panels and other plastic parts of boats that are located on the deck and exposed to the weather.
- In order to decorate various household items and interior design. Dyes for plastic can decorate furniture, decorate beautifully Wall panels or paint plastic bottles. From such bottles, craftsmen create real works of art, skillfully combining the colors of the produced bottles and additional coloring.

Paints for plastic can be used everywhere, the main thing is to choose the type of dye in accordance with the type of plastic and the operating conditions of the product.
Varieties of coloring compositions
Depending on the purpose, the following types of compositions are distinguished:
- ABS. This polymer has both primer and enamel properties and can be used both as a decorative finishes, and to increase adhesion for painting.
- Abrasion resistant. It is made on the basis of polyurethane resins with additives that give the composition additional strength. It is used for the surfaces which are exposed to big loading, it is steady against attrition.
- Tactile (soft touch). After drying, such paint on plastic forms a velvety matte structure, very pleasant to the touch. Soft touch acrylic paint is widely used for decoration, creating a feeling of comfort and visually smoothing sharp corners. She paints car interiors, Appliances and paint plastic bottles.
- Structural. Application of structural coloring compositions allows you to mask the defects that have arisen on the surface, because when this coloring matter dries, a beautiful surface with “pimples” is obtained. Structural mixtures are used for self-decoration, and to increase adhesion before the final painting.
- Powder. The use of powder dyes is not suitable for all types of plastics, but only for heat-resistant ones. For example, plastic bottles cannot be dyed with this method - they will melt when high temperatures Oh. Powder coating is carried out in a chamber under the influence of high temperatures, due to which the powder particles melt, reliably adhering to the base. In this way, it is possible to increase the strength of parts that are constantly exposed to abrasion or the effects of atmospheric phenomena. As a rule, the dashboards of ships and boats are painted in this way to give them extra strength.

From the whole variety of dyes, it is necessary to choose the type that will best match the base to be painted, whether it be a wall panel or a plastic bottle.
What to look for when choosing
When deciding which type of dye to purchase, you must carefully read the main characteristics of the composition indicated on the package:
- Adhesion. Most dyes have good adhesion to the surface, differ only in the degree of adhesive qualities. When choosing, you need to take into account what composition and smoothness of the plastic object is planned to be painted.
- Foundation compatible. Enamel for plastic should be suitable in composition to the type of surface to be painted or to the primer applied to it. Failure to follow this rule will cause the decorative layer to quickly crack or blister.
- Spreadability and hiding power. These parameters show how evenly, thickly the paint falls on the material.
- Water resistance. All acrylic paints and varnishes used for plastic surfaces are water-resistant, after drying the resulting film can be washed. But for products under conditions high humidity, in order to increase water resistance, additional additives are added, more often polyurethane.
- Aesthetics. Depending on what result you want to get, you can use paint on plastic, which gives a flat, smooth surface, or choose structural staining.
- Compliance with the basis. The instructions always indicate what type of plastic can be painted with this product.
Does it need to be primed
It is known that preparation for painting for all coloring agents consists of the following steps:
- cleaning;
- grinding;
- degreasing;
- primers.
Some types of plastic do not need priming - they can be painted immediately after degreasing, skipping one of the preparation steps. But how to determine whether to prime or not?

At home, this can be done in two ways:
- Set fire to a small piece of plastic. If during combustion the flame smokes heavily, then priming is not necessary. This is worth taking into account for those who prefer to primer plastic bottles to improve the quality of work. When burned, the bottles emit a lot of smoke, so it is quite possible to save time and money by skipping the priming work.
- Drop into water. drowned plastic parts do not need to apply soil mixtures.
Important! If it is not possible to carry out these simple tests, for example, if the wall panels have been installed for a long time and there are no leftover pieces for examination, then it is recommended not to neglect the priming work.
Necessary materials
Before you start painting, you need to stock up on the following tools and materials:
- A set of "skins" of different grain sizes. When preparing the material, they can give the base the necessary smoothness and roughness.
- water and detergent(it is better to take a neutral soap).
- White spirit or any other plastic degreaser.
- Masking tape (if it is necessary to paint not the entire product, but only part of it).
- Painting tools: spray gun, roller, brush or spray can.

Having prepared everything you need, you can get to work.
Coloring process
Before applying the paint, preparation of the base is necessary. For this surface you need:
- Wash. Small parts are immersed in water, and for washing large areas It is recommended to use a portable car wash.
- Treat with skin. Depending on the smoothness, the base is either ground or, conversely, scratched with sandpaper.
- Degrease. White spirit is most often used for this purpose, but you can take any other alcohol-based degreaser.
- Prime if necessary. If there is any doubt whether to prime or not to prime, then a primer should be applied. An extra primer layer will only increase the quality of the final result.
- Dry and you can start painting.
- What is the load on the product. How more likely abrasion or damage to the surface, the more layers must be applied.
- It is possible to apply a new layer only after the complete drying of the already applied one.
- It is recommended to use the painted product a day after applying the last layer. During this time, complete polymerization of the material will occur, decorative film will acquire all strength characteristics.
By following these simple recommendations, you can make a high-quality and beautiful color of the product. Applying paint to plastic products, you can not only give a second life to old things, but also further strengthen plastic parts.
Sometimes, when repairing, people need to paint plastic. Very often this is a design decision.
It is only necessary to remember that paint can not normally lie on any material. Of course, you can apply it, but it will quickly fly around, crack.
To obtain beautiful surface you first need to figure out what types of plastic are to be stained. Let's figure out how to paint.
To color plastic surfaces At home, you need to stock up on the following items:
- special paint or acrylic enamel in an aerosol
- acrylic lacquer finish
- protective equipment: gloves, goggles or a mask
- cover material: bag, newspaper
- masking tape or paper tape
- water in a container, rags and a special detergent
- any solvent
- fine sandpaper
If a person wants to remove deep scratches, you additionally need to stock up on putty and.
What to paint?
Sometimes people are interested in what can be used to paint plastic?
When plastic is in the form of polypropylene or polyethylene, it should be borne in mind that it is practically impossible to color it.
The paint will peel off from it in layers.
In addition, there are plastics that require pre-priming or not.
To determine which category it belongs to, you need to perform a number of actions:
- Throw stuff into a regular . If it goes under water, then it is not necessary to prime. But if it floats on the surface, then a layer of soil will have to be applied to it.
- Another way is to set fire to the material. To do this, just take a piece of material and set it on fire. If it burns with soot and black smoke, it does not need to be primed. But, if such phenomena are not observed, it is necessary to apply a primer.
It should be borne in mind that not any paint is suitable for coloring. Some of them simply will not lie on the plastic. Therefore, it is recommended to use only spray paint or special for plastic. She lays down freely, and does not require any skills in work. It can be found at any hardware store.
Procedure
When painting plastic surfaces, you must adhere to the following scheme of actions:
- Cleaning the plane from dirt and dust, with a sponge or brush dipped in soapy water. When dirt remains, the paint does not lay down evenly. It is allowed to wash strong dirt with bleaching agents. After that, dry thoroughly.
- When the surface is clean and dry, it must be treated with a solvent. This will help degrease it. But such a composition is best washed off with water.
- It is recommended to sand the surface before applying the paint. This procedure will help the composition to lie very evenly. It is better to use sandpaper with a grit of less than one hundred and eighty. Correctly chosen paper will not make too strong a roughness. After grinding, it is required to sweep away all the resulting dust with.
- Construction tape is useful for pasting those places that are not subject to staining. After the work is completed, it is simply removed.
After all the above steps, you can begin direct staining. To do this, shake the can of paint for thirty seconds.

It is applied to the surface from a distance of 20 - 30 centimeters.
This should be done with uniform and smooth movements, without jerking.
When the first layer dries, you can apply the second.
Typically, this paint takes about twenty minutes to dry.
Then it will lie flat, and the surface will look smooth.
After the paint has completely dried, which takes about three hours, varnish can be applied.
Features of the plastic staining procedure
There are some nuances associated with coloring plastic:
- Even the most demanding plastics can be painted with a primer. They are sold in hardware and automotive stores. They can be applied by wiping the surface or by spraying.
- The surface to be painted must be dry and perfectly clean.
- A thick layer of paint increases the drying time.
- Drying should be carried out at a temperature of eighteen to sixty degrees, depending on the thickness of the layer. In the presence of high humidity, the drying time can be greatly increased. Complete drying can be observed after five days.
- Plastic may be different varieties so ideally use a special paint for this.
- Soft plastic products are best painted with elastic enamels. This will help prevent future corrosion.
- It is recommended to first grind, and then apply a primer for painting plastic.
It is practically impossible to paint such materials as:
- polystyrene
- polycarbonate
- polyethylene
Special spray paints have tips for easy spraying, which is very convenient when painting.
Is it possible to paint plastic with a brush

How to paint PVC plastic?
Of course, paint can also be applied with a brush.
But you should take into account the fact that the paint applied in this way will dry much longer.
This is not very convenient, since the painted product will have to be protected from dust.
After all, it will stick well to paint that has not yet dried.
The very technology of painting objects in this way is almost the same as with an aerosol:
- The product is washed and dried before painting.
- Degreased.
- The plane to be painted is polished.
- The paint is applied.
Additionally, many people cover eraser items with varnish. It is applied only on perfectly dry and clean surface. Paint applied with a brush can take a very long time to dry. But the varnish will dry in about two hours.
On the video - painting plastic with a spray can: