Books, regardless of the genre of works, must always be kept in order. As a rule, special cabinets or mezzanines are used to store paper literature. Hanging shelves for books are very popular. These devices can be made independently. Next, we will figure out how to make a shelf for books with your own hands.
simple designs
The most common are book shelves, which consist of upright posts with holes drilled into them. Special pegs are inserted into them. On them, in fact, the shelf for books is kept. It is not difficult to make such a design with your own hands. Can be used as stands wooden blocks or metal Bookshelf holders can be a steel corner.
Shelving
They are different. Shelves for books of the simplest design are made using bars stacked on both sides. They fit on top. The dimensions of the shelves for books can also be different. It all depends on the number and dimensions of the publications themselves. For example, there may be shelves for books, the dimensions of which are 220x22x2 cm. It is recommended to use bars from larch, pine or fir. It is also quite possible to apply chipboard or elements old furniture. For the construction of a medium-sized rack (5 shelves), about 65 bars will be required. Popular and metal constructions. They are collapsible, as a rule. When increasing or decreasing the number of volumes, book shelves can be added or removed. It is possible to mount lamps with reverse side rack. If desired, bars and shelves can be painted, wallpapered. Such simple design suitable for a room decorated in a minimalist style.
Important point
When a do-it-yourself book shelf is assembled, the distance between the support bars should be at least 1.2 meters. Otherwise, the panel will sag under the weight of the literature. In general, such a design will look unattractive.
Is it possible to do without bars?
Can. Not everyone would like to see bars on the walls. There are two other ways to make a bookcase.
1. The first option. In this case, the rack looks like a box. It is built in between two walls. This is how a niche is formed. The vertical sides are not formed by a solid board. They are made up of scraps, the thickness and width of which is the same as that of a book shelf. These parts are supporting and are used instead of bars. The design is assembled like this:

The second option - invisible mounts
The shelf for books on the wall can be mounted so that the fixing elements are completely invisible. In this case, the boards are mounted on long screws (there should be 4 of them - 2 on each side). They are screwed in using wooden corks(rods). The part of the screw that protrudes from the wall will be the support for the shelf. To decorate the protruding element, you can use a plastic tube of the desired diameter. It can be transparent or colored in any suitable color. Screws are recommended to be used with a round head. In the areas where these support elements will be screwed in, holes of the appropriate diameter should be drilled. Hardwood pins can be used instead of metal screws. Being also supporting elements, they must be included in the recesses that are made on the underside of each shelf. Difficulties may arise with the installation of pins strictly horizontally. To control the position (vertical/horizontal) it is necessary to use a level. There are also supports in the form of a violin, with a coupling or screw thread. It is enough to simply install shelves on them - both made of wood and glass. Such structures are quite durable and attractive in appearance. The holes for the support parts must be drilled precisely so that they are exactly parallel.

Cremaliers
You can install shelves along the wall without forming a niche. Here it would be possible to fix the consoles using rack-and-pinion brackets (kremaliers). Exists different types frame structures. For example, there are those where the vertical slats are covered with panels of lacquered or waxed wood or plywood, which is covered with material. As a result, only shelves and consoles are visible. This design allows you to completely mask any surface defects. You can also use metal or wooden racks, which are placed by surprise from ceiling to floor. Blocks are fixed on them - quadrangular compartments. Shelves are fastened with expansion screws.
Hanging shelves
Instead of conventional structures, you can make hinged open shelves or cabinets without a back wall. They are easily fixed with two bolts and brackets. The first is screwed into the wall. Staples (pendants) are fixed to the shelves on the reverse side. The latter can also be fixed in racks with notches. In this case, they will be invisible. Such hinged shelves are assembled from chipboard. Two-centimeter boards are joined to each other using a plug-in spike, puttied and painted.
Rack "cubes"
This is what a children's bookshelf might look like. The construction device based on the principle of playing with cubes allows you to create fun structures, based on numerous combinations. By stacking individual drawers in a herringbone pattern in the center of the room, you can separate the two parts of the library with editions of different subjects. For example, it can be entertaining and educational literature. Bookshelves- boxes can also be placed along the walls at a certain distance between the structures. The gaps between the boxes can also be used to increase the total amount of storage. Boxes are assembled from chipboard, the thickness of which is 1 cm. The dimensions of the boxes are 50x23x25 cm (approximately). In each box, two boards (top and bottom) of 50x23 cm can be used, sides - 25x23 cm and back wall 48x23 cm. Since the width of all elements does not exceed 23 cm, you only need to cut the details along the length. When cutting, it is recommended to mark and cut the material one by one. You should not draw everything at once. This is due to the probable error when cutting in 3-4 mm.

Box assembly
The side walls are attached to the ribs of the rear side. For fixing, you can use carnations and / or glue. After that, the top board and the bottom are attached to the side and back parts. After that, the entire structure is dried (if glue was used). All sides of the box must be proportional and equal relative to each other. The edges are polished sharp corners and the edges are rounded. At the end, the structure can be painted. If it is intended for storing children's books, then it can be decorated colorfully, make applications or use multi-colored paint. When choosing materials for finishing, it is necessary to take into account their safety for a person, especially for a child.
Rotating whatnot
It can be a piece of furniture and placed in a recreation area. Very convenient to use whatnot on roller wheels. This design, painted in two colors (red and white or white and ocher), looks very modern and attractive. In general, the design is quite simple to manufacture. The main difficulty can only be fitting and fixing the components at a right angle. To assemble the bookcase you will need:

Preparatory work
Identical shelves are cut from the boards. A support rod is made from a bar (the desired length is sawn off). Draw diagonals on the shelves and draw a square in the center of their intersection. Its cross section must exactly match. A through square is cut out in the upper and lower shelves. It should turn out so that the support beam enters it without difficulty. Sampling of wood can be done using a chisel. Next, side vertical walls-partitions are made. Everything finished items skinned. To facilitate the process, on the shelves - from the bottom and top sides - you need to put marks where the vertical partitions will be located.

Assembly technology
Four vertical partitions are glued and nailed to the support rod. This will form the first floor. The whole structure is glued and nailed to the bottom shelf. The upper edges of the vertical partitions are smeared with glue. The next shelf is mounted on the rod and nailed. Further, the vertical partitions of the next floor are fixed in a similar way. Carnations are clogged obliquely. Their hats need to be drowned with a riveted hammer. By the way, you can replace them. Next, the next shelf is glued and nailed. The work is repeated until all parts are installed. At the level of the last vertical partitions, the supporting central rod is cut off. Next, glue and nail four side walls. They should be of such length that their upper part protrudes 1, and the lower part protrudes 2 cm beyond the edges of the horizontal elements. Four rollers are fixed on the axles from below. Their total height is 9 cm. After that, the surfaces are again carefully sanded, all edges are smoothed, and the edges are polished. After completing these works, you can start finishing the whatnot. It can be painted, varnished or decorated with decorative carved elements. This design does not take up much space, compact and convenient.
If books play an important role in your life, then you should definitely make sure that there is a place in the house for them to be safe and convenient storage. And why not combine business with pleasure and equip this place yourself? Tips on how to make a bookshelf with your own hands and where to hang it can be found in our article.
Preparatory stage
Of course, you can easily go to a store or furniture market and buy a good bookcase there, but wouldn't it be better to spend a little time and effort and make this accessory with your own hands, choosing the right size, design and color you need? We think you will agree that the second option sounds more tempting. Therefore, before getting down to business, it is worth thinking and giving answers to some simple, but very important questions:
- What is the purpose of the shelf? In order to diversify the decor? For maximum book placement? For books of a certain size or to display them?
- What size will the shelf be? How many tiers will she have: one or more? Answering this question, it is worth taking all the necessary measurements, deciding on the length, width and height of all the constituent parts.
- What load should the future shelf withstand? This is very important question, because the choice of materials will depend on the answer to it, because someone needs a shelf for a couple of small books, and someone wants to place a whole collection of heavy encyclopedias on it.
- How and where the shelf will be attached. There are several mounting methods. The most common options are to the wall or to the ceiling. Are additional mechanisms needed?
- Choosing a shelf design There is already a free flight of fantasy and imagination. Lots of options.

What materials are needed to make a bookshelf?
It is simply impossible to answer this question unambiguously. The need for certain materials for the manufacture of bookshelves depends solely on their design and purpose.
For example, for wooden shelf you will need:
- several boards of different sizes;
- electric jigsaw or saw;
- self-tapping screws, bolts, screws, nails, etc.;
- screwdriver;
- glue;
- grinder or sandpaper;
- processing agent wooden surfaces.

For a fabric shelf a set of materials and tools is completely different:
- two pipes of small diameter, preferably iron, you can use the remains of the cornices;
- brackets designed for fastening cornices;
- the cloth;
- sewing accessories.

For the manufacture of rope bookshelf usually use:
- rope or ropes of different widths and lengths;
- wooden boards;
- hooks or nails with which the shelves will be attached to the ceiling or wall;
- drill with a set of drills;
- means for processing wooden surfaces and paint.
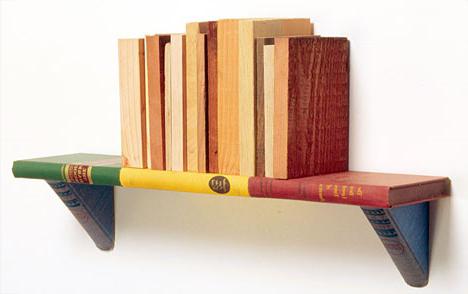
In fact, anything can become a material for making a shelf with your own hands, you just need to add a little imagination and creativity. Many use old unnecessary things: ladders, boxes, wooden boxes, TV cases, various elements furniture and even cast iron pipes.

Making a bookshelf
There are a lot of design and manufacturing options, so let's focus on three of them.
wooden shelf
Having decided on the size and design, it is necessary to prepare all the elements for assembly. To do this, from wooden boards using electric jigsaw or saws cut out the details the right sizes, we process them grinder and wood preservative. When the parts dry, we assemble the structure with nails or screws. finished shelf you can paint or leave natural colors, it all depends on the interior design.

fabric shelf
The option is even simpler than the previous one. Attach the brackets to the wall with screws. We process the edges of pre-measured pieces of dense fabric with a thread and a needle, or sew sewing machine. Further, in accordance with the width of the pipes, we bend the fabric from two opposite edges, forming holes. We put it on pipes, fasten it to the brackets and the shelf is ready.
Rope shelf
This option is surprising in that not a single nail or screw is required for its manufacture. in pre-prepared wooden planks drill two holes at the same distance from the edges. We pass a rope or a tight rope of the required length into the holes obtained. Tie a knot under each level to secure the boards. We fix the finished shelf in the chosen place.

A few ideas for using hanging bookshelves
Hanging shelves are a fairly versatile accessory, they can be easily placed in any room. We want to talk about a few ideas for using hanging bookshelves.

Shelves in the corners rooms perfectly fill non-functional voids. It is quite difficult to pick up furniture in such “uncomfortable” parts of the room, and small hanging shelves are exactly what you need. If one of these corners is behind the door, then you can put things there that you want to hide from prying eyes.
Shelves on both sides will not only be a useful solution, but also save the household from hitting it.
Horizontal wall shelves With vertical stripes- beautiful design solution, however, in this case, it is necessary to observe a clear color scheme, otherwise you get a very dubious composition.

Will look modern and fashionable shelves filling empty niches in the walls. Considering that such voids are usually the most different forms and size, this design will give the interior originality.
Clear, level shelves the same size , located one under the other - it's boring and quite ordinary. Place them asymmetrically, and the interior will sparkle in a completely new way.
Books long and firmly occupied a place in the apartments and houses of people who consider themselves educated and modern.
In addition, placing orderly rows of gilded book volume covers is a good way to make the interior of the room exquisite and stylish.
Ideal way to store books bookcases and on shelves. This is how thousands of volumes are stored in libraries.
A beautiful shelf for books can be hung in the children's room, in the living room, in the office. The original place for storing books -.
Bookshelves- suspended structures designed for storage books. They consist of a base, side posts, top and rear covers (optional). Shelves are open closed type, single or multi-level.
Closed shelves have doors, usually glass, multi-level options include several "floors" to store books.
What are they made from?
Shelves for books can be made from a variety of materials, including improvised ( plastic bottles, old boxes, belts and others), however greatest the following have spread:
- natural wood. It makes no sense to paint the advantages of this, proven for centuries, universal raw material for the production of furniture. Bookshelves made of wood, as well as other pieces of furniture, tables, beds: all these products are characterized by high material strength;
- Plywood. These are thin wooden plates glued together - veneer. The direction of annual rings in each next layer of veneer is turned to 90 degrees, it makes the plywood more durable. The outer layers of veneer can be made from more valuable breeds, which gives a special texture pattern to plywood;
- chipboard(chipboard). Produced from waste wood - shavings, which are pressed together with the addition of glue - synthetic resins. The surface of the chipboard is not very beautiful, so it veneer veneer, paper or plastic.
Shelves for books hang up on the wall or place shelves with books On the floor next to the wall, which saves a lot of space. In addition, you can make a small shelf and combine it with the bed. This design looks very stylish and fresh.
Making a bookshelf on the wall
Option one
 For work need:
- planed smooth boards with a thickness 18-25mm, width 25-30 cm. The type of wood is not significant, but preference should be given to solid deciduous species - oak, beech, ash. If you have softwood boards on hand, select least resinous;
- Two metal suspension;
- Electric drill with drills for wood diameter 2 and 10 mm;
- Screwdriver or screwdriver;
- screws 40 x 3 mm with countersunk head 22 pcs;
- Corks wooden diameter 10 mm - 6 pcs;
- Carpenter's saw;
- Sanding paper grit P150 - P180;
- Joiner's glue;
- Marking tool - pencils, square, ruler, you can use a thickness gauge;
- Varnish furniture, brush for application.
Stages of work
The manufacturing process can be divided into stages:

- Material preparation. Mark and saw off two boards for the side posts, three boards for the bases and covers to the dimensions of the drawing. Mark and drill through holes in the boards with a 2 mm drill bit. With a 10 mm drill to a depth of 5 - 7 mm, drill nests for decorative corks;
- Using a screwdriver or screwdriver collect shelf, starting from the middle board. When assembling Special attention give perpendicularity boards;
- Apply on the inner surface 10 mm nests glue, insert and press the plugs into them. Remove excess glue with a rag;
- Screw the awnings. Options 2 : open and secret. For the second option at the end of the racks, you need a drill 10 mm drill two or three holes about 3-5 mm;

- brush apply on furniture shelf varnish. After the first layer has dried, sandpaper along the fibers delete raised pile. Apply a second coat of varnish, working with the brush along the fibers.
Advice:
- If failed to purchase special decorative plugs, then you can do this: nests with a diameter 10 mm do not drill, but when screwing in the heads of the screws slightly drown in a tree. Then apply putty to the screwing points, which should be sanded after drying;
- To simulate darker woods, use wood stain. The simplest stain - water solution magnesium permanganate (potassium permanganate). However, over time, such a stain brightens.
Second production option
 Is different connection of elements in the shelf - on dowels instead of screws. For implementation, it is necessary to purchase at a building materials store instead of screws 40x3 mm, dowels (diameter 8 mm), 18 pieces.
Holes for dowels drilled out:
- In the middle of the racks top cover and the base - through and through;
- in the middle shelf - to the depth of the length of the dowel minus the thickness of the board.
Assembly carried out on wood glue using wooden hammer - mallets. Glue can also be applied to the joined ends of the boards. Decorative corks are not needed with this method. It is better to score dowels not to the end, but leaving 1 mm over the board to sand then level the surface. Before the glue dries, the shelf is pulled together with clamps.
If there is nowhere to put books, then you can get creative and make a bookshelf with your own hands. A thing created by yourself will always be highly valued and will fit into the interior in an original way. Classic option a shelf with glass is considered to be a shelf for storing books, as it protects the books stored inside from dust and fading in the sun.
Before you start making a bookshelf, you need to accurately determine its purpose, location and appearance, as it must fit the existing interior and hang on convenient location. Having chosen the place where the shelf will be located, calculate its size in order to know the number the right materials for the manufacture of.
The choice of materials for manufacturing

For a multi-tiered book shelf, you need to use thin and light boards.
Wood is considered a classic material for making furniture by hand, as it is affordable and easy to process. If the shelf is single-tier, then you can use thick and heavy boards that look very solid in the interior. And if a multi-tiered structure is planned, like a small hanging rack, it is better to choose a thinner and lighter tree so that the shelf does not fall under its own weight.
The bookshelf can be made of glass. In relation to wood and plastic, glass does not win either in terms of strength or in terms of lightness, but it looks much more sophisticated. Working with glass is complex and requires a lot of time and accuracy. Gluing glass is the best epoxy resins, and to give strength to the bends, you can lay a thin aluminum profile. The biggest difficulty is drilling the glass to install the fasteners, so a beginner is better off without it. Ordinary window glass not suitable for making a bookshelf, so you will have to purchase thick impact-resistant glass.
How to make a bookshelf out of wood?
To create a simple wooden structure you will need:

A jigsaw will be needed to cut boards when building book shelves.
- boards or furniture board;
- varnish or stain, brush or roller, you can stock up acrylic paints for drawing patterns and ornaments;
- hacksaw, electric jigsaw;
- pencil, measuring tape, building level;
- sandpaper or grinder;
- a screwdriver and a set of wood screws of small length.
You will need to make 3 pairs of blanks from a standard board 200x20 mm. The blanks should be 200x20x400, 190x20x260 and 195x20x1200 mm, 2 of each size. To saw off the boards accurately and evenly, you need to use a measuring tape and a marking pencil, and then cut exactly along the intended line. The cut will be clean if the hacksaw and jigsaw are sharp, it is recommended to change the blade before work.
Grinding blanks is an obligatory stage of processing after sawing according to size.
The number of sandpaper is selected depending on the condition of the blank boards. For very rough and splintery surfaces, a large skin is needed, which can then be changed to a smaller one.
Assembly of shelf parts

The longest blanks are attached to the vertical elements, which are the shelves. The shortest boards are added between them, placing them also vertically between 2 bases. These boards serve as partitions and additional supports, since long shelves under the weight of books can bend and deform the structure. Each cut is fixed with a pair of self-tapping screws, placing them at the ends of the workpieces. If the shelf will be used for very heavy things, you can fasten it with not 2, but 3 self-tapping screws, and add corners for greater strength.
Finishing
After sanding, to make the product more attractive, you can slightly round the corners or even cut small patterns on the surface. With a burner, you can create interesting motifs inside and out. And if there are only paints and a brush, the tree must first be primed by applying 2-3 layers of PVA glue or special primer to the surface. After that, the work with the brush will go easier. It is better to choose acrylic or tempera paints, but you can also paint with oil, with patience until it dries completely.
Wooden products need at least impregnation with varnish, stain or waxing for their safety. Untreated wood cracks and cracks, deforming at the same time. good option are several layers of yacht varnish, which perfectly protects the wood. Since there will be a lot of work bad smell, it is better to transfer this stage to the balcony or to the garage, in extreme cases, to the stairwell. If a drawing is varnished, it is sometimes important to choose a varnish that does not give yellowness. Yacht varnish is not suitable in this case, it is better to take automotive or acrylic, but the latter is not too resistant to various atmospheric influences.
Long gone are the days when handicraft furniture was considered the lot of very poor people. Each apartment or house had cabinets, walls, shelves and other furniture made according to a single model. What kind of design could we talk about with this approach?
choose today suitable furniture easier, but it does not always correspond to the desire of the owner or the preferences of the hostess. In addition, it often happens that exactly what is needed and cannot be found, for example, a suitable hanging shelf. In this case, there are 2 options left: to order its production in the workshop, hoping that they understood you, and the product will be of good quality, or you can make shelves on the wall with your own hands, which will be a good and convenient addition to the intended design.
Types of wall shelves

Thanks to modern universal tool a home craftsman can make almost any shelf, even in an apartment, not to mention working in his workshop. However, before taking up the tool, it is important to determine the type of shelf being designed. This will help the table, which describes design features wall shelves and their scope.
|
wall shelf type |
Description |
|
Classic |
It is generally accepted that the classics are part of ancient culture that has come down to us. It is also called the generally accepted pattern of style. Shelves made in classical style, are easy to manufacture and uncomplicated in shape, so they are easy to make at home. |
|
Corner shelves have a triangular shape and are attached to two walls at once. Most often, this is a small structure placed in the bathroom or in a room where other types of shelves will interfere. Also, corner shelves can be external. |
|
|
Mounted |
Hanging shelves are intended only for hanging on a flat surface and are most often above average. This arrangement allows not to occupy free space premises. |
|
floor standing |
Floor shelves can not only stand on legs, but also, for greater stability, be attached to the wall, especially when they are narrow and high. Most often, these are shelves such as whatnots or vertically arranged modes. |
|
The word modus is often used to refer to varieties of forms. For this reason, shelves with different sizes used parts began to be called modes. Sometimes it can resemble abstractionism. different kind modes can be found in one or another style of the room. |
|
|
Exclusive |
This is not a separate section, but a collection of everything extraordinary and non-standard. You can meet shelves from old suitcases, an obsolete TV, and even water pipes. There is no limit to the imagination. |
Wooden shelves on the wall
Wood is an excellent material, as a shelf made from it will turn out to be attractive, solid, ergonomic and practical. Although the rapid development of scientific and technological progress, as well as the emergence of new technologies and innovative materials did not use natural wood less popular and in demand, yet among admirers natural beauty and style, it is still in demand.

The advantages of natural wood furniture abound, and it's not just about attractive appearance, but also at high operational qualities, thanks to which wood has been used for many centuries both for construction purposes and for the manufacture of original items interior. Even without having great experience in carpentry, you can make a beautiful wooden shelf. If you are a beginner, then it is best to start with this universal building material, taking as a basis soft, inexpensive types of wood intended for the manufacture of furniture.
Manufacturing
First of all, you need to think over the dimensions of the shelf being made and decide on the place where it will be located, only after that purchase boards. If the design will be assembled from the material at hand, then you will have to adapt to its dimensions.
Of course, you can not do without a tool. The minimum is a wood saw and a Phillips screwdriver. Of course, with such a set of tools, there is nothing to take on manufacturing. complex design.
Video: the minimum set of tools for a beginner carpenter
To assemble something solid and beautiful, you will need:
|
Jigsaw or hand saw |
It will be more convenient to work with a jigsaw, but if it is not available, then you can use a standard hacksaw for wood with a fine tooth. Using this tool, blanks for the future shelf will be cut out. |
|
Sander or a set of skins of different grain sizes |
What a grinder will do in 5 minutes, you will have to spend an hour manually. With the help of this tool, the blanks are sanded, and then the entire shelf. |
|
Electric drill |
If shelves are made of chipboard, then self-tapping screws or confirmations cannot be screwed into such parts without first drilling a hole for this fastener. In wooden parts, you also need to drill holes for self-tapping screws. |
|
Screwdriver or screwdrivers |
Only if the shelf is small and uncomplicated, you can painlessly tighten a few self-tapping screws or screws with a screwdriver. If there are a lot of attachment points, then it will be very difficult to do it manually. It is not recommended to use an electric drill for these purposes, since it will not be possible to control the screwing force. |
|
In addition to the fastener itself, it is advisable to buy plugs to match the color of the shelf. It is important to know that, depending on the chosen fastener, the plugs are selected individually. |
|
|
Varnish for wood |
Varnishes for wood are different. Many people prefer to use alkyd varnishes with urethane group additives, as it dries quickly (up to 12 hours) and is very durable, which is important for a product that will be used frequently. |
|
Medium size brush (40‒80 mm) |
The shelf will need to be varnished. At home, this procedure can be performed with a brush. Since most wood varnishes are toxic and emit a strong odor, work must be done in a ventilated non-residential area. |
|
square |
With it, you can make all the corners even. If this tool is not already there, then you can check the correctness of the angles ceramic tiles. Accuracy will not be perfect, of course, but still better than nothing. |
|
Manual frezer |
Make a wooden shelf more beautiful manual router, with which you can create a variety of decorative patterns at the corners, at the ends and in the middle of the product. |
After acquiring wood, it needs to be examined in order to have an idea of \u200b\u200bhow the finished shelf will look. The fact is that raw boards do not differ much from each other, but after applying the stain dark places will show up more than the highlights. If you can’t make sidewalls from one board, then pick up boards whose texture will be similar.
Consider the manufacture of a shelf using an example. Let's say we want a 3-cell wooden wall shelf that measures 100 cm wide and 40 cm high.
For the convenience of calculations, the depth of the product will not be calculated. The thickness of the board is 2 cm. The length of the self-tapping screws is 40–50 mm.

So, we need to cut blanks of this length from the board:
- 50 cm - 2 pcs.
- 96 cm - 2 pcs.
- 26 cm - 2 pcs.
Now let's explain how we got such dimensions.
If everything is clear with sidewalls of 50 cm, then the length of the remaining parts must be calculated. For example, 2 horizontal parts are 96 cm long. There is nothing complicated here either. With a shelf width of 100 cm, subtract the thickness of the two boards used as side walls:
100-(2+2)=96 cm.
Similarly, we obtain the height of the jumpers (vertical 2 parts), with a height of the inner part of the shelf of 30 cm:
30-(2+2)=26 cm.
It goes without saying that all paired parts (in our case) must be the same size.
Assembling a wooden wall shelf
Each part must be processed with a grinder, only then it can be fastened with other parts into a single structure. Hands must be clean, because untreated wood is very easily soiled.
Let's return to our diagram, where you can see that the bottom board is slightly raised above the bottom level, which has 2 explanations: firstly, it makes the shelf more beautiful, and secondly, it protects the lower edge of the sidewalls from cracking when screwing in screws. Usually this indent is within 1 cm, but if necessary, it can be done more. For safety, in the place where the self-tapping screw is screwed into the lower part of the sidewall, it is necessary to pre-drill holes with a thin drill. In our case, they will be at a height of 2 cm from the bottom edge of the sidewalls (1 cm indent + 1 cm to the middle of the thickness of the board to be screwed).
Now step by step about the assembly process.
- Raising the bottom shelf by 1 cm, the side parts are screwed to it one by one. It is necessary to ensure that when screwing in the screws, they are located straight.
- Turning the workpiece upside down, mark the position of future shelves. If the cell sizes are the same, then divide 96 cm by 3 (in our example, 3 cells). It will turn out 32 cm. We retreat from the sides by 32 cm and put on the board the points into which the self-tapping screws will be screwed (3 centimeters from the edge of the board). It is better not to draw a line, as it will be visible under a layer of varnish, but to put small marks on the ends of the board.
- In this position, jumpers are screwed to the bottom of the shelf.
- The shelf is turned over and after checking the vertical position of the jumpers, they are screwed on.
- Now it's the turn of attaching the sidewalls to the top crossbar.
- So that the shelf is even, and subsequently it does not warp, in the lower part, on the reverse side, you can fix the location of the parts with flat window corners. If the back wall is attached, then the corners are not needed.

- The assembled structure is painted with a stain, after which it dries, you can proceed to varnishing.
- The entire surface of the shelf must be cleaned of dust and dirt. After applying the first layer, you need to check if there are any villi in it. If there is, then you need to sand everything again with an abrasive skin to remove them. If the varnish is thick and does not lay down evenly, then it can be slightly diluted with a solvent recommended by the manufacturer.
- In total, you need to apply 3 layers of varnish, with a frequency of 12 to 48 hours. This interval depends on the type of varnish used and the temperature. environment. In any case, you need to wait for it to dry. Every time check the surface for the presence of bumps and grains of sand. If something is noticed, immediately grind with an abrasive sponge until the defect is removed. Then again you need to apply varnish.
- After the varnish has dried, it remains to fasten the hinges at the back, after which the shelf can be hung on the wall.
Making a corner wooden shelf
Corner shelves can be of various heights, and have different amount levels.
Video: Making a corner shelf
Consider the sequence of manufacturing wooden corner shelf from slats 20 × 50 mm.

- After examining the slats, you need to choose the most even ones, with a minimum number of knots - 2 frames will be made of them, 40 × 70 cm in size. For their manufacture you will need:
4 parts 70 cm long;
6 pieces of 30 cm.
- Frame parts are preferably glued together with clamps.
- Now it's time to make the shelves. They can be made:
Type-setting, gluing several rails, from which the details of the desired shape are then cut out and edged on the outside with a curly rail;
From a sheet of plywood;
From laminated chipboard. In this case, the cut must be sanded and pasted over. furniture edge or in some other way, at your discretion;
From a fragment of old furniture, if the front is even.
- The shelves are screwed to the frames and varnished.
- It remains to fasten the hinges and hang the finished shelf in its place.

For a corner shelf, a set of 2 hinges is best suited, as in the illustration. If you hang the shelf on a loop with a wide ear, then you can then move the shelf along the wall and put on the second loop.
Photos of wooden shelves


Scheme


DIY book shelf
Though electronic devices displace printed editions from a person's life, yet many people carefully store books and magazines dear to their hearts, the storage location of which often leaves much to be desired. If this is the situation for you, then it will be useful to learn how to make bookshelves that would be functional and fit into the interior.

If you are not a specialist, then you should not immediately take on the manufacture of a complex structure. Next, we will look at the process of making a simple bookshelf from slats.
Stages of work
To work, you need a tool:
- screwdriver;
- electric drill;
- electric jigsaw or wood saw;
- roulette;
- construction corner.
Concerning Supplies, then you will need:
- slats 20 × 40 cm;
- self-tapping screws for wood 3.5 × 45 mm (based on 2 pcs. for one attachment point).
Now you can start making the shelf. First of all, you need to make "ladders" - side parts (and with a large length of the shelf, the middle ones too).
The dimensions of the shelf will depend on the size of the books on it will be stored. If the books are not large, then shelves 20 cm wide will be enough to accommodate them. The height of the cells is selected in such a way that it is convenient to take the book from the shelf. Also, the height of the cells at different levels may differ. As for the height of the shelf, this is a matter of personal preference, but it is important to consider that although this shelf will be attached to the wall, it is not designed to be suspended, so it will stand on a solid surface.
First, the slats are prepared, which will be used as racks, and crossbars are already attached to them, for which holes are drilled along the edges of each plank with a thin drill.

Having screwed the cross member with one self-tapping screw, you need to check its position.

Having aligned the rail, it is fixed with a second self-tapping screw.

The assembled "ladders" are laid on the floor, and after checking the correctness of the angle, they begin to be fastened with slats, which are cut off according to the length of the structure.

Then the rest of the rails are attached.

The structure rises and is attached to the wall, after which the remaining rails used as shelves are fixed.

This shelf will hold a lot of books.

The assembled shelf is designed for a large number books, but if you need a smaller design, then you should pay attention to the video instructions and photos of the products you like.
Video: bookshelf on the wall
Shelves for flowers
You can often see when people decorate their homes. artificial flowers but still nothing can replace the freshness of natural beautiful plant. Many owners, trying to decorate the wall, let climbing plants, hang flowerpots from the ceiling or place them on shelves of their own design. The advantage of this approach is that it is possible to make something of your own, unique and fit into the interior of the room. Depending on the type of flowers available and their quantity, a shelf is constructed.

Of course, you immediately want to make something voluminous and beautiful, which is quite natural, but first you can try your hand at making a simple but neat shelf.
Manufacturing steps
We will need a board 120 × 25 mm with a length of at least 130 cm. It will be more convenient to sand the board while it is intact.

After that, one edge must be cut so that the corner is straight, and mark every 20 cm clearly at an angle of 90 °. A building corner will help with this, but if it is not there, then you can use any hard object, the corners of which are straight, for example, ceramic tiles.

When cutting a part, you need to hold the hacksaw at an angle relative to it. If the hacksaw is held straight, it will be difficult to make a straight cut.
![]()
To make a shelf, we need 6 parts of 20 cm each.

Every detail must be cleaned from all sides with sandpaper. The canvas used should not be coarse-grained, otherwise the wood may be scratched.

Since the screws will be twisted close to the edge of the board, in order for it not to split, holes must be drilled in these places with a thin drill.

The entire assembly process consists in fastening the parts with self-tapping screws. If PVA glue is available, then the joints must first be smeared with it, and, after giving the glue a minute to set, fasten the parts. When screwing in the screws, do not use excessive force so that the board does not split. It is enough that the head of the screw is flush with the board.

Since our shelf is wall-mounted, you need to fasten the fasteners to it.

Since the height of the shelves is small, and the design is not very durable, climbing or low plants in small pots can be placed on it.

Such a product can be used not only for flowers. So that the shelf does not get dirty, it is best to open it with varnish.
Video: unusual flower shelves
original shelves
If you want to diversify your interior, then comfortable, original and beautiful shelves can be made from various materials hanging them in your office or living room. They will help to conveniently arrange a lot of things and can give the rooms a more comfortable look. Do unusual shelves on the wall it is possible from wood, glass, plywood, fiberboard, pieces of tin and even from water pipes.
We can say with confidence that unusual shelves are the embodiment of originality and exclusivity. However, in everything you need to know the measure and understand that when designing a product, it is often necessary to maintain the style of the existing style. But now it has become fashionable to divide the room into zones. After looking at the photos in which interesting ideas are embodied, you will take something as a basis, adding your own zest.
Photos of original shelves


TV shelf
It often happens that in small room Well, there's nowhere to put the TV. For example, a small kitchen is already crammed with furniture, it would seem, what kind of TV can we talk about. However, a shelf located in a corner or on a free wall can become a way out.
V modern concept, when TVs began to simply hang on the wall, a TV shelf is called a shelf located under the TV, on which a DVD player can stand. In one case or another, the shelf can be made at home. We won't stop at simple shelves, which can be placed under the TV, since we have already touched on the manufacture of such ones in the article, but we will only consider the manufacture of one on which you can put the TV.
Let's start with the simplest - a plywood corner shelf attached to the wall. In our case, it will be installed near the window, and so that the curtain does not interfere, we will make a small recess for it on the left side. The corners of the workpiece need to be sanded, then all of it (or only the upper part) should be pasted over with self-adhesive tape with a pattern of your choice.

Fasteners must be screwed to the workpiece with self-tapping screws, through which it will be attached to the wall. It is necessary to pick up self-tapping screws, the length of which will be slightly less than the thickness of the plywood sheet from which the workpiece was cut. In our case, the front fastening elements are located below, and the rear ones are on top of the workpiece, but if nothing interferes with the bottom, then they can also be installed under the shelf.

Now you need to put the shelf at the required height and mark the attachment points on the wall. The shelf is removed to the side and holes are drilled in the marked places.

We insert dowels into the holes so that they do not stick out from the wall.

Now you can attach the shelf.

The shelf must be level and the fasteners must be well clamped.

Now you can install the TV, and bring the wires down through the gap left in the corner.

Such a shelf does not need additional finishing and is immediately ready for use for its intended purpose.
In this article we have made general review wall shelves and gave an example of manufacturing simple designs. If you want to see new ideas or need help, leave a comment at the end of the article.