The Windows button on your keyboard performs many important tasks. With its help, the Start menu opens and many key combinations are pressed (Windows-R, Windows-X and others). But, in some cases, this button can create inconvenience. Especially often, gamers complain about it, because accidentally pressing this button throws them out of the game. If you also encountered such a problem, then this material should help you. Here you will learn how to disable the Windows button using the registry and third-party programs.
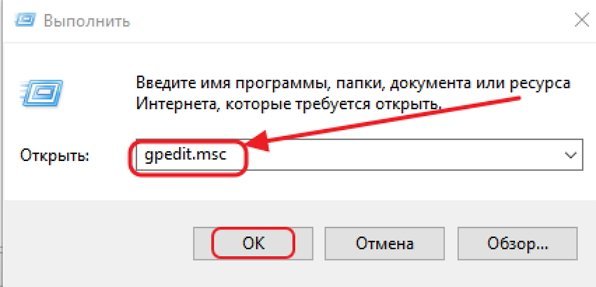
The Windows key can be disabled in a variety of ways. First of all, we will consider turning off via. To do this, press the key combination Windows-R and run the command " regedit». By the way, if the Windows button is already disabled and you can't use Windows-R, then you can type "regedit" into the Start menu search.
After opening the registry, you need to go to the " HKEY_LOCAL_MACHINE\SYSTEM\CurrentControlSet\Control\Keyboard Layout". Note that you need a section called "Keyboard Layout" and not "Keyboard Layouts".

After that, in the " Keyboard Layout" section, you need to create a binary parameter" Scancode Map». To do this, right-click on an empty space, select "New - Binary Value" and name it "Scancode Map".

As a result, you should get something like this.

Now open it and enter one of the values given in the table below into it, close the window by clicking on the "OK" button and restart the computer. After the reboot, the Windows button should be disabled.

Please note that these parameters must be entered manually, since copy and paste does not work in this registry editor window.
| Value of the Scancode Map parameter | Result |
| 00 00 00 00 00 00 00 00 03 00 00 00 00 00 5B E0 00 00 5C E0 00 00 00 00 | Disabling the right and left Windows buttons. |
| 00 00 00 00 00 00 00 00 02 00 00 00 00 00 5B E0 00 00 00 00 | Disabling the left Windows button. |
| 00 00 00 00 00 00 00 00 03 00 00 00 00 00 5C E0 00 00 5D E0 00 00 00 00 | Disabling the right Windows button and the Menu button (on the right). |
| 00 00 00 00 00 00 00 00 04 00 00 00 00 00 5B E0 00 00 5C E0 00 00 5D E0 00 00 00 00 | Disabling the right and left Windows buttons and the Menu button (on the right). |
In order not to enter the value of these parameters manually, you can prepare a .reg file with all the necessary changes. To do this, create a text document, paste the content below into it, and save with the .reg extension instead of .txt. After that, run the created REG file and it will automatically make all the necessary changes to the registry. Next, you need to restart your computer, and the Windows button will be disabled.
REG file to disable the right and left Windows buttons.
Windows Registry Editor Version 5.00 "Scancode Map"=hex:00,00,00,00,00,00,00,00,03,00,00,00,00,00,5B,E0,00,00,5C, E0.00.00.00.00
REG file to disable the left Windows button.
Windows Registry Editor Version 5.00 "Scancode Map"=hex:00,00,00,00,00,00,00,00,02,00,00,00,00,00,5B,E0,00,00,00, 00
REG file to disable the Windows right button and the Menu button (on the right).
Windows Registry Editor Version 5.00 "Scancode Map"=hex:00,00,00,00,00,00,00,00,03,00,00,00,00,00,5C,E0,00,00,5D, E0.00.00.00.00
REG file to disable the right and left Windows buttons and the Menu button (on the right).
Windows Registry Editor Version 5.00 "Scancode Map"=hex:00,00,00,00,00,00,00,00,04,00,00,00,00,00,5B,E0,00,00,5C, E0,00,00,5D,E0,00,00,00,00
In order to enable the Windows button back, just go to the registry, open the "HKEY_LOCAL_MACHINE\SYSTEM\CurrentControlSet\Control\Keyboard Layout" key, delete the previously created "Scancode Map" setting and restart the computer.
Disabling the Windows button using programs
As an alternative to digging through the registry, you can use special programs to remap and disable keyboard buttons. Next, we will look at several such programs.
Simple Disable Key 3.0 () is a free program for disabling individual buttons and key combinations. With it, you can disable the Windows button or disable individual key combinations using this button. For example, you can disable Windows-X or any other key combination.
SharpKeys () is a free program for remapping and disabling buttons. With this program, you can reassign faulty or disable unnecessary buttons.
KeyTweak() is a free program for remapping buttons and disabling buttons. It has an intuitive interface and many features.
The latest version of the operating system from Microsoft is literally crammed with various components and services. And if some of them can be considered conditionally useful, then some of them would be desirable to turn off and not remember about them anymore. And many who want to download and try it in action note this very desire. Since each action is inside the operating system, each word entered subsequently turns into an advertisement. In this way, Microsoft is trying to get the maximum benefit from the owners of shareware Windows 10.
Removing everything unnecessary that can track your actions and analyze them is easy enough. And this can be done absolutely at any time. Do not worry if you did not immediately turn off unnecessary components.
During system installation
To use this method, during the installation of Windows 10, you must abandon the default settings and click on the barely noticeable "Settings" inscription. It is located at the very bottom of the existing text.
In this section, you will be presented with all the components that may interfere with the future work of Windows 10. To prevent this, you must disable them all by moving the slider to the appropriate position on the left. In total, you will have to disable two pages of functions.

It is also undesirable to enter your username and password registered on the Microsoft website during the installation process. This step can be simply skipped, it does not affect anything. To do this, at the bottom there is a small inscription "Skip this step."

If you meet these minimum requirements, then the new operating system will practically not indicate any information about the user. It simply will not have special functions for this. Since all the necessary components for this are simply disabled. Therefore, you can use it easily and fearlessly.
If the operating system is already installed
On an existing operating system, disabling all unnecessary components that can interfere with a calm and anonymous life is not very difficult. Only you will have to disable only some of the functions of Windows 10, which are especially annoying. Namely:
- Windows Defender.
- Context search.
- advertising ID.
- cloud services.
Each of them has its own way to turn it off.
Windows Defender
To get rid of this tool, you need to go to Settings, and then proceed to the "Update and Security" section. There is a tab such as "Windows Defender" in which we need to work. You should disable the functions responsible for sending data and protecting the cloud, as in the screenshot.

By the way, if you don't want to go through the settings, just install any other antivirus. This will turn off Defender automatically.
Contextual search and Cortana
These two tools are turned off together. Of course, in Russian Windows 10, the latter does not work by default, because Russification was not invented for it. However, it's better to be safe.
You should click on the search in the bottom line of the desktop, and then click on the lowest icon in the left column that displays Settings. And there you need to disable both Cortana and Internet Search.

Advertising ID
To disable this functionality, you need to go to the Settings we already know, from there go to the Privacy section. In the general settings, located at the very top of the left column, you will have to remove the “on” state. for the first three components.

The next tab we need is Speech, Handwriting and Typing. Here you need to prevent Windows 10 from forwarding your speech in order to learn the functionality of Cortana. Anyway, we already turned it off.


After completing these steps, do not close Privacy - it will still come in handy.
telemetry
To get rid of passing these parameters, you will have to program a little. For this, a built-in tool called PowerShell is used. To use it, you need to put the PC into console mode using the Windows + X key combination.
A command line will appear in which you need to type the combinations written in the screenshot.

In short, these commands delete already collected telemetry data, disable the operation of this service and completely cut off the ability to record any new data.
After that, we open Privacy again, and from there we go to “Reviews and diagnostics”. It is necessary to completely prohibit the formation of reviews (select the appropriate item in the drop-down menu), and then set the item “Basic information” in the “Diagnostics and Usage Data”.
Clouds
To prevent cloud storage from working, it’s enough not to use your account when working with Windows 10. To do this, you need to find the section in Settings that allows you to manage accounts, and then go to the “Your account” section from there.

You can opt out of using a Microsoft account by signing in with a local account. To do this, just click on the appropriate inscription and enter the data. Thus, only those components of the 10th generation system that are required can be left.
(Visited 32 367 times, 1 visits today)
After the initial installation of the Windows 10 operating system from removable media, it is necessary to activate it to confirm the license rights to own this version. This is required to prevent the use of pirated content and to verify the product license key against valid Microsoft keys. Before the key is entered, the system will work in trial mode for thirty days, after which it will stop starting. Within the specified period, the user is obliged to activate or uninstall the system. Windows 10 will automatically remind you to activate it every time you start it by displaying a watermark with reminder text in the lower right corner of the display. This sometimes annoys many users, which is why they start looking for ways to remove the auto-pop-up label. The removal process itself is not difficult and does not require special training.
Why does the Windows 10 activation watermark appear?
An activation reminder watermark may appear in test versions, in pirated copies of the licensed OS, or if the user for some reason forgot to activate Windows 10 after the installation was completed on the computer.
Windows 10 activation message appears on desktopThis feature is fixed in the registry and has no effect on the speed and performance of the computer. You can also use an unactivated version of Windows 10 (with some restrictions), but this is not very convenient. Most users try to remove the annoying reminder using third-party programs or editing branches in the registry.
There are a number of rules to follow when removing the activation reminder watermark, as in most cases third party software is used. Often, not everyone wants to take risks and change registry entries, rightly fearing to disrupt the normal operation of the computer.
Basic rules to follow when removing a watermark:
- always create a system restore point before you start deleting a watermark using the registry;
- use software only from official websites of manufacturers;
- watermark removal and activation reminder methods should have good recommendations on the net and be tested many times.
If you do not follow at least one of these rules, then no one guarantees you that the result of removing a small problem will not become a big problem, which entails a complete reinstallation of Windows 10.
How to remove the inscription about the activation of Windows 10
There are several ways to remove the automatic system reminder to activate the software product. Sometimes the result is achieved immediately, sometimes you need to sort out several ways to achieve success. The main ways to remove the Windows 10 activation watermark include using third-party programs and editing the registry. You can also use the system's built-in software, but in home versions, not all notification removal features are included in the Windows 10 installation package.
How to remove the activation inscription through the registry
There are two easiest ways to remove the activation label.
First way:

The second way (for those who are afraid to manually enter the registry update):

Remove notification about activation by third-party programs
You can remove the watermark that says you need to activate Windows 10 using third-party programs. There are several such programs, and they have been repeatedly tested in practice by various user groups.
The Universal Watermark Disabler utility has the following advantages:
- can quickly remove watermarks on any version of Windows;
- provides support for any languages at work;
- does not harm system files;
- instantly removes all watermarks on the display.
How to work with the utility:

Video: Removing Watermarks with Universal Watermark Disabler
In addition to the most common Universal Watermark Disabler utility, two small utilities are used for the same purposes:

How to remove the activation window and disable pop-up notifications
You can remove the activation window and turn off notifications in Windows 10 using the built-in Notifications and Actions service.
This service includes the following features:
- allows and prohibits the appearance of pop-up alerts for Windows 10 and third-party programs;
- allows you to show the system alerts about various events and updates received from the network;
- using pop-up menus, it speeds up the process of ejecting removable media, activating and deactivating various adapters.
Using this service, you can turn off annoying notifications, block them and turn off the notification center.
Disabling Notification Center
In Windows 10, you can turn off the notification center using three different methods:
- using a change in Windows 10 settings;
- by editing the Windows 10 registry;
- changing the group policies of the system.
Turn off notifications by changing the settings settings
This is the fastest way to prevent unnecessary notifications from appearing on the display. It is carried out in several stages:

Video: Turn off notifications by changing Windows 10 settings
Disable Popup Notifications Using Registry Editor
This method is suitable for users who already feel confident enough working in the registry editor. Changes to be made to the registry and disabling alerts require the following algorithm:

Pop-up alerts are now disabled.
It should be borne in mind that in the latest versions of Windows 10 developed, regardless of the user's desire, settings for turning off notifications in the registry may already be created. This can only be tracked during a clean installation from a licensed distribution.
Turn off notifications when changing the general group policy
Video: Disable Notification Center and Toast Notifications
Removing watermarks and notifications in Windows 10 is a fairly easy process. At the same time, it is necessary to clearly understand that they were not developed by chance. It is quite possible that the activation failed for some reason or there was a failure in the system files. A watermark that was previously deleted as annoying will not appear. This can lead to the fact that at the most inopportune moment you will not be able to start the system and you will see a warning on the display about the end of the period allotted for activating Windows 10. You will need to spend time looking for a key, which, as always, will not be at hand. Therefore, you need to think carefully about whether it is worth removing watermarks and inscriptions about the need for activation.
Windows Defender (or Windows Defender) is an antivirus from Microsoft built into the latest OS versions - Windows 10 and 8 (8.1). It works by default until you install some third-party antivirus (and during installation, modern antiviruses disable Windows Defender. True, not all of them have recently) and provides, if not ideal, protection against viruses and malware (although recent tests suggest that it has become much better than it was).
This guide is a step-by-step description of how to turn off Windows Defender 10 and Windows 8.1 in several ways, as well as how to turn it back on if necessary. This may be required in some cases when the built-in antivirus does not allow you to install a program or game, considering them to be malicious, and possibly in other situations. First, the way to turn it off in Windows 10 Creators Update is described, and then in previous versions of Windows 10, 8.1 and 8.
Additional: In recent Windows 10 updates, the Windows Defender icon is displayed in the taskbar notification area by default.
You can turn it off by going to the task manager (via right-click on the Start button), turning on the detailed view and turning off the Windows Defender Notification icon item on the Startup tab.
The next time you reboot, the icon will not be displayed (nevertheless, the defender will continue to work).
How to disable Windows 10 Defender Creators Update
Starting with the Windows 10 1703 Creators Update, disabling Windows Defender has changed somewhat. As before, disabling is possible using the settings (but in this case, the built-in antivirus is disabled only temporarily), or using the local group policy editor (only for Windows 10 Pro and Enterprise) or the registry editor.
Temporarily disable the built-in antivirus using settings
In this case, Windows Defender will be disabled only for a while and in the future the system will re-enable it. If you want to disable it completely, you will need to use the following methods.
Disabling Windows 10 Defender in the Local Group Policy Editor
This method is only suitable for Windows 10 Professional and Enterprise editions, if you have Home - the next section of the instructions shows a method using the registry editor.
After that, Windows 10 Defender will be completely disabled and will not affect the launch of your programs in any way (and also send samples of programs to Microsoft), even if they are questionable. Additionally, I recommend removing the Windows Defender icon in the notification area from startup (see Startup of Windows 10 programs, the task manager method is fine).
How to Completely Disable Windows 10 Defender Using Registry Editor
The settings configured in the local group policy editor can also be set in the registry editor, thereby disabling the built-in antivirus.
The procedure will be as follows (note: if any of the specified sections are missing, you can create them by right-clicking on the "folder" located one level higher and selecting the desired item in the context menu):
Done, after that you can close the registry editor, the antivirus will be disabled. It also makes sense to remove Windows Defender from startup (provided that you do not use other features of the Windows Defender Security Center).
Disable Defender Windows 10 previous versions and Windows 8.1
The required steps to turn off Windows Defender will be different in the last two versions of the operating system from Microsoft. In general, it is enough to start by performing the following steps in both operating systems (but for Windows 10, the procedure for completely disabling the defender is somewhat more complicated, which will be described in detail below).
Go to the control panel: the easiest and fastest way to do this is to right-click on the "Start" button and select the appropriate menu item.
With the Control Panel switched to Icons view (under View in the upper right), select Windows Defender.
The main Windows Defender window will launch (if you see a message that "The application is disabled and is not monitoring your computer", then most likely you just have a different antivirus installed). Depending on which OS version you have installed, follow the steps below.
Windows 10
The standard way (which is not quite workable) to disable Windows 10 Defender looks like this:
As a result, the protection will be disabled, but only for a while: after about 15 minutes, it will turn on again.
If this option does not suit us, then there are ways to completely and permanently disable Windows Defender 10 in two ways - using the local group policy editor or the registry editor. The method with the local group policy editor is not suitable for Windows 10 Home.
To disable using the Local Group Policy Editor:
As a result, the Windows 10 Defender service will be stopped (i.e. it will be completely disabled) and you will see a message about this when you try to start Windows 10 Defender.
You can also follow the same steps using the Registry Editor:
Done, now, if the built-in antivirus from Microsoft disturbs you, then only with notifications that it is disabled. At the same time, before the first reboot of the computer, you will see the defender icon in the notification area of the taskbar (it will disappear after the reboot). You will also receive a notification that virus protection has been disabled. To remove these notifications, click on it, and then in the next window click "Do not receive more notifications about anti-virus protection"
If the built-in antivirus has not been disabled, then there is a description of ways to disable Windows Defender 10 using free programs for this purpose.
Windows 8.1
Disabling Windows Defender 8.1 is much easier than the previous option. All you need is:
As a result, you will see a notification that the application is disabled and does not monitor the computer - which is what we needed.
Disable Windows 10 Defender with Free Software
If for one reason or another you cannot disable Windows 10 Defender without using programs, you can also do this with the help of simple free utilities, among which I would recommend Win Updates Disabler as a simple, clean and free utility in Russian.
The program was created to disable automatic updates Windows 10, but can disable (and, importantly, enable back) other features, including defender and firewall. You can see the official website of the program in the screenshot above.
The second option is to use the Destroy Windows 10 Spying or DWS utility, the main purpose of which is to disable the tracking function in the OS, but, in the program settings, if you enable advanced mode, you can also disable Windows Defender (however, it is disabled in this program and by by default).
Disabling Windows Defender Using Command Prompt or PowerShell
Another way to disable Windows Defender 10 (although not permanently, but only temporarily - just like when using parameters) is to use the PowerShell command. Windows PowerShell must be run as an administrator, which can be done using the taskbar search and then the right-click context menu.
In the PowerShell window, enter the command
Set-MpPreference -DisableRealtimeMonitoring $true
Immediately after its execution, real-time protection will be disabled.
To use the same command from a command prompt (also run as administrator), simply type powershell followed by a space before the command text.
Disable "Enable Virus Protection" notification
If, after taking steps to disable Windows Defender 10, the notification “Turn on virus protection. Virus protection is disabled", you can follow these steps to remove this notification:
Done, you shouldn't see any messages that Windows Defender is disabled going forward.
Windows Defender says Application is disabled (how to enable)
If you have Windows 8 or 8.1 installed, use the steps below.
If, when you enter the control panel and select the "Windows Defender" item, you see a message that the application is disabled and does not monitor your computer, this may indicate two things:
- Windows Defender is disabled because a different antivirus is installed on your computer. In this case, you should not do anything - after removing the third-party antivirus program, it will turn on automatically.
- Whether you turned off Windows Defender yourself or it was disabled for some reason, you can turn it on here.
In Windows 10, to enable Windows Defender, you can simply click on the corresponding message in the notification area - the system will do the rest for you. Except when you used the Local Group Policy Editor or the Registry Editor (in which case, you should do the reverse operation to enable the defender).
In order to enable Windows Defender 8.1, go to the Action Center (right-click on the "flag" in the notification area). Most likely, you will see two messages: that the protection against spyware and unwanted programs is turned off and the protection against viruses is turned off. Just click "Turn on now" to start Windows Defender again.
It would seem, why do this? Still, there are times when the Windows key (the one between Ctrl and Alt) gives the user a headache. For example, to avoid accidental shutdown of the game during particularly active online battles. That is why manufacturers of gaming keyboards often bundle software with the ability to software disable the Windows key. If you came to this article from a search, then you probably know why you need to disable the Windows key.
Does your keyboard not have built-in mechanisms to disable the Windows key? No problem. You can also turn off the Windows button on the keyboard using the usual system tools, namely using the registry editor. If this method is not an option for you, consider also disabling the Windows key using simple third-party utilities.
For reference: Following this instruction requires an account with Administrator rights. If you don't have one, you will need an Administrator password.
One more time for reference: After disabling the Windows key, you will deprive yourself of many useful bonuses, like dozens of keyboard shortcuts. If you have read several of the instructions on our website, you have probably noticed that we often recommend using a combination of Win+ R(execute) Win+ X(context menu Start), Win+ E(Conductor), Win+ I(Parameters) and many others. All of them speed up your computer (not to be confused with speeding up your computer) and save you a few extra clicks. Once the Windows button is disabled, all of these shortcuts will no longer be available. You can read more about keyboard shortcuts in Windows in the article Windows Hot Keys.
How to Disable the Windows Key Using the Registry Editor
A relatively simple method that does not require the user to download any third-party software or take a lot of time to complete. All actions take place inside the Windows registry system editor. Please note that there are certain risks associated with editing the registry, so we advise you to follow the instructions carefully and never change registry values blindly. No matter what happens, you are solely responsible for your computer.
To enable the Windows key back, you need to follow the same instructions, only delete the key you created ScancodeMap. Please note that launching the registry editor using a key combination Win+ R it won't work anymore (you just turned off the Win button), so use the search. Just open the start menu and type the same command regedit and press Enter.
How to disable the Windows key using SharpKeys
This simple but very functional utility will allow you to turn off the Windows key or change the settings of any other button. We won't go into too much detail on how to use SharpKeys, but will only focus on disabling the Windows key (or keys if you have two). The advantage of SharpKeys over disabling through the registry editor is that the utility allows you to equip the key with some more useful action, and not just a dull disabling.

To return everything back and turn on the Win button again, open the same SharpKeys, click on the parameters you recorded and press Delete, or DeleteAll. Then press again WritetoRegistry so that the application can overwrite your changes and roll back everything to its original state. After that, don't forget to restart your computer.
Such a simple instruction will help you get rid of random game shutdowns or any other phenomena that made you turn off the Windows key.