The famous Darnitsky bread owes its appearance to the Darnitsa bread factory, which is located in the city of Pushkin. Its recipe was developed back in 1933, and since then the popularity of this wonderful bread has not fallen at all. It is so wonderfully balanced in taste and usefulness that there is no need to change anything about it. According to GOST, Darnitsky bread consists of 60% rye flour, and 40% of first-grade wheat flour. Everyone knows that rye flour is much richer in composition and amount of nutrients than wheat flour, and bread made from it is lower in calories. Darnitsa bread is always made with rye sourdough, and we know that sourdough bread does not mold and is stored longer. However, some people are afraid to eat rye bread due to stomach problems. Although it is for this reason that wheat flour is added to the dough of Darnitsky bread, which noticeably reduces the acidity of the bread. Despite the fact that large, reputable enterprises are involved in the production of this glorious bread, you can safely bake it at home.
Ingredients
- 40 gr dough
- 160 gr
- 110 gr
- 280 gr dough
- 200 gr
- 130 gr
- 225 gr
- 2-3 g
- 7 g
Instructions
Which you bred yourself within 5 days, is in your refrigerator. We simply select the required amount from the jar.

Mix the dough: add water to the dough, stir, then add flour. Stir until all the flour is moistened, cover the bowl with a lid or film and leave to ferment for 6 hours at a temperature of 30 degrees or at room temperature for 10-12 hours. During this time, it will not increase in volume very much, but it will become noticeably looser.

Now knead the dough directly. Mix dry products - wheat and rye flour and salt.

Dissolve the yeast in water, pour this mixture into the dough and stir.

Combine the liquid and dry mixtures together and knead the dough.

Cover the bowl with the dough with film or a lid and leave to ferment at 30 degrees Celsius for 60 minutes. You can get 30 degrees if you put a bowl of dough in the microwave, and a glass of boiling water next to it. Or put it in the oven and turn on the light bulb. During this time, the dough increases in volume by 2-3 times.

The next step is shaping the bread. I will bake Darnitsky hearth bread, although starting from 1986, this bread began to be baked in molds. I don’t have molds, but I do have a cast iron frying pan. So I shape my future bread into a ball on a floured surface. I cover a round bowl with a napkin grated with flour, and place the formed ball in it, seam side up. And I leave it to proof for 60 minutes again at 30 degrees Celsius, making sure to cover it with film.

In many cities and villages of Russia (and not only Russia) there is a type of bread called “Darnitsky”. It sells and is popular with many. Do you know where this famous brand came from? Some people think that this brand originates from the name of the Kyiv suburb of Darnitsa, but this is absolutely not true! “Darnitsky” bread is a purely Leningrad phenomenon, and this recipe and production technology were born back in 1933 at a new bakery built that same year using the latest technology of the time on the outskirts of the Petrograd side.
To put it very simply, the recipe was as follows: “rye round bread, produced according to a special technological scheme on dough, liquid starter, without yeast.” The bakery received No. 11 and a very unusual, noticeable from afar, round constructivist building. This was the customer's requirement - to place a fairly large production line in a very limited area. This building is clearly visible if you drive both along Levashovsky Prospekt and along the street. Big Zelenina. The production of the Darnitsky bread variety was mastered at the plant back in 1933, and the production technology is maintained to this day. Then the variety gradually spread to other cities of the Soviet Union.


But this plant is famous not only for its undoubtedly unusual building, but also for the fact that during the years of the siege it was one of the six Leningrad bakeries that worked around the clock and did not stop working for a single day. In pre-war Leningrad there were 14 bakeries, but only six of them worked continuously throughout the blockade, including this one, the Eleventh. Unfortunately, during the blockade, the unusual and extremely noticeable shape of the building turned into a huge inconvenience and even an outright danger. Bakery plant No. 11 was bombed from the air four times, and at the end of 1941 it was camouflaged by a special service (I could not find photographs of it in a camouflaged state, alas).

However, the plant operated all the time, and quickly restored the damage, which was not very critical - here its very compact size played in favor of the plant. However, as one of the main life support facilities, it received fairly powerful anti-aircraft cover. According to various estimates, bakery No. 11 baked 17-20% of all bread in besieged military Leningrad.

Bread "Darnitsky"- This is tin bread, popularly called “brick”. Its taste has a characteristic sourness. Its recipe suggests increased acidity. According to GOST 1986, a loaf of “Darnitsky” bread should weigh 700 grams. AND shelf life of “Darnitsky” bread is 72 hours, that is, three days. True, now that enterprises baking bread are not constrained by strict limits on recipes and weights, but are only guided by the tastes and demands of customers, these parameters can vary, and bread products turn out different.
The composition of Darnitsky bread, all according to the same GOST of 1986, includes peeled rye flour, first-grade wheat flour, yeast, salt, and water. And, again, modern manufacturers can develop their own recipes. Instead of yeast starter, use other types of starter. The main thing is that you are familiar taste of “Darnitsky” bread remained the same, or was as close to the same as possible. Otherwise, the consumer will be dissatisfied and will not buy Darnitsa.

About health: increased acidity makes"Darnitsky" breadan undesirable product for peptic ulcer disease, as well as for increased intestinal acidity. That's why production of rye “Darnitsky” bread involves adding wheat flour to the dough.

Compound:
Glass of water (300 ml)
Table. lie honey
150 grams of rye flour
250 gr. wheat flour
one and a half teaspoons lie yeast
one and a half teaspoons lie salt
Grows. oil - two tbsp.
Bread machine recipe:
Mix oil, honey and water, combine and sift two types of flour, place all ingredients in a bowl.
Mode - main
Weight - 750 grams
Crust - dark
Do you want to try a fairly simple, but very tasty version of homemade baking, aromatic and fragrant, prepared on the basis of rye and wheat flour?
We invite you to bake “Darnitsky” bread; the recipe for a bread machine will definitely help you with this, because it is especially pleasant to eat a product prepared with your own hands. Almost always it turns out tasty, moderately moist, not crumbly at all, rises evenly and is evenly baked, suitable for all dishes.
This recipe was born a long time ago - in 1933 at the Petrograd bakery. “Darnitsky” is a tin bread with a characteristic sourness and weighs 700 grams according to GOST 1986. Its shelf life is 72 hours or three days. The composition of this popular bread (according to GOST) includes peeled rye flour, first-grade wheat flour, yeast, water and salt.
Many people believe that making bread at home is a very complex and time-consuming process, but this is not entirely true. You just need a little free time and a little patience.
Recipe for homemade Darnitsa bread in a bread machine

Ingredients
- Rye flour - 150 g + -
- — 325 g + -
- - 1.5 tsp. + -
- — 300 ml + -
- - 1 tbsp. + -
- - 1.5 tsp. + -
- - 2 tbsp. + -
Cooking Darnitsa bread: step-by-step recipe in a bread machine
- We heat the water to a temperature of 37-39 degrees.
- First put the liquid ingredients into the bread machine bucket, then the dry ingredients. If the bread machine’s instructions say the opposite, then we act depending on the requirements of its manufacturers. Pour water, vegetable oil into a bucket, add honey.
- Shake the container a little to dissolve the honey.
- Mix sifted wheat flour with rye flour.
- Pour the mixture into the bread maker bucket.
- We make two small depressions in the flour, pour salt into one, and yeast into the other. If the kitchen is hot, this is very bad, as the dough may sour.
- Set the main program for 3 hours. During the first kneading of the dough, which lasts 10 minutes, we monitor its condition. The bun should hold its shape and not spread. If the bun does not form, then add a little flour.

8. When the bucket becomes clean, it means that all the flour has been mixed into the dough. To prevent it from falling off during baking, do not open the lid.
3 hours after the start of the program, our Darnitsa bread is ready. We take out a bucket and carefully remove the loaf. Cool the bread on a wire rack to prevent it from getting soggy.
- Wheat flour can be used of both premium and first grade.
- Rye flour is suitable both sifted and peeled. When kneading the dough, regulate the amount of both.
- Honey can be replaced with molasses or granulated sugar (1.5 tablespoons).
- After complete cooling, a loaf of “Darnitsky” bread weighs about 750 grams.
Recipe for Darnitsa bread with caraway seeds and malt
Another recipe for making delicious Darnitsa bread, which is easy to implement at home, is a recipe with the addition of caraway seeds and malt. True, it is a little more difficult to implement, but such bread always turns out aromatic and tasty.
Ingredients
- Rye flour – 325 g;
- Wheat flour – 225 g;
- Water – 330 ml;
- Honey (or sugar) – 2 tbsp;
- Vegetable oil – 2 tbsp;
- Dry yeast – 2 tbsp;
- Malt – 4 tbsp. (or 5 tbsp dry bread kvass);
- Cumin – 1 tbsp;
- Salt – 1.5 tbsp.

How to bake Darnitsky bread with caraway seeds and malt
- Pour 80 ml of boiling water over the malt (dry kvass) in advance and let it cool.
- Sift rye and wheat flour.
- Place all the dry ingredients in the bread machine - rye and wheat flour, yeast, caraway seeds, salt.
- Mix water, honey and vegetable oil.
- Carefully pour a mixture of water with honey and vegetable oil into the bread machine container, and also add brewed malt.
- We begin the dough kneading process by activating the “Gluten Free” function.
- We help the bread maker by scraping off the dough in the corners of the bucket with a plastic spatula and mixing it into the main mass.
- After 1 hour, turn off the “Gluten Free” mode and turn on the “Baking” mode. Set the time to 1 hour 30 minutes.
- At the end of the program, our Darnitsa bread with caraway seeds and malt is ready. We take out a bucket and carefully remove the loaf.
- Cool the bread on a wire rack to prevent it from getting soggy.

Bread with the addition of rye flour, prepared at home with your own hands, no matter what recipe you choose, will always be better, tastier and, of course, healthier than store-bought. Well, “Darnitsky” bread (a recipe for a bread machine that we reviewed step by step above) will exceed all your expectations, because it will turn out not only tasty, but also very appetizing in appearance! Even children will appreciate your efforts.
This bread has been with me, probably since birth... for as long as I can remember, it has always been on the table. I won’t say that I loved him since childhood and even vice versa, because as a child I always ate poorly and therefore sat for hours at a plate of cold soup with a spoon in one hand and a piece of black bread in the other…. What kind of love is there! And how can you love something that is always at hand... Today you can also buy it almost everywhere - in any store and even in any bread stall... It looks like the same black brick, but it TASTES!!! HORROR!!! I don’t know what they bake it from, but it’s absolutely impossible to eat it (((and even more so when you perfectly remember what it can and should be! Therefore, from time to time I bake Darnitsky myself. The process is quite long, but not at all tiring, since there are active body movements for about 10 minutes, and the rest of the time the leaven works - it raises the dough, saturates it with aroma, giving it a unique taste, characteristic only of this type of bread... And when the bread is baked and cooled, you cut off the fried edge, a little butter on top, a little salt... Oh my God! to live well, and life is good! And truly an old friend is better than two new ones!
For the recipe you will need:
For the dough:
130 g sourdough with peeled rye flour (65 g flour and 65 g water)
115 g rye flour
65 g warm water
For the main batch:
200 g wheat flour 1st grade
130 g peeled rye flour
1 g dry instant yeast (you can do without it)
250 g warm water
PREPARATION:
You can see how to remove sourdough
The recipe requires a fairly large amount of starter – 130 g; if you have less, you can increase the required amount by adding equal amounts of flour and water to the existing amount of starter. For example, I have a “control” amount of sourdough - 45 - 50 g, which I refresh daily, leaving 5 - 10 g and adding 20 g of flour and water. If I’m going to bake bread, then the day before the next refreshment I don’t take away the starter, but rather add 50 g of peeled rye flour and 50 g of water, stir and leave for 4 hours or, as a lazy option, refresh late in the evening and leave overnight, and In the morning I use it to knead dough.
This is what the starter looks like before kneading the dough.
This is the flour I used this time.

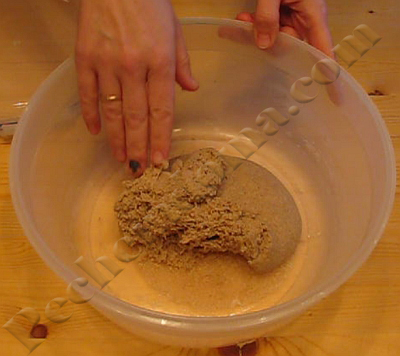
For the dough, mix all the necessary ingredients into a thin dough.

With a damp hand, roll the dough, cover and leave in a warm place (preferably at 28 - 30 C) for 3 hours.

The finished dough should increase noticeably in volume and become porous and airy.
Add 1 s wheat flour and peeled rye flour to the prepared dough. Make a well in the center of the flour slide, pour in a little water from the total amount, stir in a little flour until the batter is like pancakes, add the yeast, let stand for 5 minutes so that the yeast is saturated with water and more readily goes into solution, and then stir so that the yeast dissolves , and leave it alone for 20 minutes.

Add salt to the remaining water and stir.
Add saline solution to the bowl and knead the dough.

When kneading the dough, the most important thing is to achieve its homogeneity. When the dough becomes homogeneous, knead it for another 2 - 3 minutes, right in the bowl, playfully, and this will be quite enough. Round the dough, cover and leave in a warm place (28 - 30 C) for an hour and a half.

Grease the bread pan well with vegetable oil.

Place the dough on a work surface moistened with water and roll it into a roller as best you can. Iron its outer surface and with this ironed surface down, place the dough into the mold.

Using wet hands, level the top until it is even and smooth.

Cover the pan and leave in a warm place until the dough doubles in volume.

Before placing in the oven, spray the top of the dough with water, and if during the proofing process the top surface of the dough becomes uneven, burst bubbles appear, then before placing in the oven, you can grease the bread with thin dough - for the dough, take 1 - 2 tablespoons of wheat flour 1 s and add this amount of water so that you get a very thin, pourable dough, about the same as for pancakes, and very carefully and carefully grease the bread with it before placing it in the oven.
Place the prepared bread in an oven preheated to 250 - 260 C and bake for the first 10 - 15 minutes at this high temperature, and then lower the temperature to 220 C and bake the bread until fully cooked. In total, the bread bakes for about 1 hour. NO steam!!! those. no steam at all - neither at the beginning nor at the end, and please make sure that by the time the bread is placed in the oven, the oven is really very well heated and it really is 250 - 260 C.
While the bread is baking, you can prepare starch jelly for a glossy crust. To do this, take half a teaspoon of potato starch, add about 50 ml of cold water, stir and gently heat until thickened. I usually heat it in the microwave, but you can also heat it on the stove.
Immediately after the oven, brush the top of the bread with the prepared jelly or simply spray with cold water.

Let stand in the pan for 15-20 minutes, then carefully remove and let cool slightly. Wrap the warm bread in a towel and leave for another 3 - 4 hours and only then can you cut it.

Bon appetit!
I really love brown bread. And I really like white too. And I love black, damn it. In general, I love good bread. But bread, like wine, does not go well with every food. For example, no matter how hard I try, I can’t imagine a still life based on rural life, something called “Lunch in the hayfield”, where on a rag spread on freshly cut grass there would be boiled eggs, a pile of salted lard, a couple of onions along with feather, a jar of milk and a baguette or loaf. I can’t imagine this, no matter how hard I try. But a crust of rye hearth is a must. Or an apartment, a kitchen, a very ordinary lunch, the husband came home from work and immediately got up to the stove and sat down at the table, where there was a plate of hot pea soup on smoked ribs, a salt shaker standing next to a pepper shaker, a small jar of strong mustard, slices of pork belly, a small round a bowl of aspic and a plate of brioche slices. Well, I can’t imagine this. Or another picture: vodka, herring, slightly melted butter, milk mushrooms, sour cream, a cast iron frying pan of fried potatoes... and a French roll. Rave.
But I see Darnitsa bread everywhere, not only not superfluous, but also necessary. Still, custard rye, like Borodino’s, is not for everyone. I agree, he has more than enough fans, but still. I myself know several people who cannot stand pure black bread. And everyone likes neutral gray, or at least it doesn’t cause rejection. In addition, when playing a baker working from home, baking a great custard black is quite difficult. The cooking process itself, in general, is quite simple, but there is never enough time.... not everyone is lucky enough to have enough time, not everyone works from home. In this case, Darnitsky fits into the working day. It may not be perfect, but it fits. And if you work on “time management”, it won’t bother you at all. Let's talk about him.
A couple of weeks ago, I started a grape starter. This is an amazing lazy way. You need to take flour, mix with water, put a sprig of grapes inside, cover with a towel and forget for 5-10 days. By the end of the period, you will have a spontaneous fermentation starter, which will need to be converted into a working one. Luda wrote in detail and with pictures in this article.
As a person with an awl in the ass, always looking for and not a stranger to experiments, I decided to develop spontaneous fermentation from the sourdough obtained from grape juice and fruit yeast two sourdough workers: from wheat flour and from rye. I can’t say that I’m pleased, but I was very pleased with the rye one. To be honest, I was afraid that I would get caught again and get hit with a rake... but it worked out, and now I can say for sure that there is no black line (I admit, I thought about this after messing with the Toulon roll dough and getting a rather dubious sourdough milk bread, which tastes like sour rye), you just need to always follow one simple principle: when you bake bread, forget about other things, and most importantly, don’t rush.
About sourdough.
When I started the starter on the grapes, I was prepared for the fact that a lot of liquid would be cut off during the fermentation process. Luda also talks about this. This liquid can be: a) drained and b) diluted 1:1 with flour and sent back to the starter.
I had very juicy grapes, so the first time I drained the liquid (1-1.5 cups), and two days later, I mixed the same volume of grape juice with flour. Therefore, I cannot say for sure that my sourdough ultimately has a moisture content of 145%. Wheat is somewhere nearby, but with rye flour - definitely not, because... I fed her equal portions of flour and water, taking half the weight of the feeding as the flour norm.
That is:
1 feeding:
200 gr. spontaneous fermentation starters
75 gr. rye peeled flour
75 gr. water
2 feeding:
85 gr. rye peeled flour
85 gr. water
Fermentation 6 hours at room temperature
3 feeding:
200 gr. test obtained from the previous feeding
95 gr. rye peeled flour
95 gr. water
Fermentation 12 hours at room temperature
And so on for 5 days. I think it can be argued that in the end the humidity of the sourdough is close to 100%, which I consider optimal for rye sourdough. This greatly simplifies the calculations when preparing the dough; in addition, with such humidity, the starter is perfectly stored in the refrigerator. The rye sourdough developed in this way, which stood in the refrigerator for 4 days, turned out to be completely not in need of any multi-stage refreshing. I just let her warm up and fed her according to the recipe, and then let her ferment for 6 hours. The fermented starter did not grow much in volume, only 25-30%, and did not have the slightest sign of air bubbles on the surface, but inside raged and had the porosity of good black bread, and the pore size was almost the same - the size of a black peppercorn. The aroma is sour, without the slightest sign of vinegar or alcohol odors, purely rye, very tasty. The taste of the sourdough is moderately sour and I even, sinfully, wanted to let it ferment some more, but since the day was turning to night, I didn’t.
So, the recipe for Darnitsky bread, based on GOST 1986.
Total weight of ingredients for a loaf weighing 800-850 g.
Peeled rye flour - 300 gr. (60%) including flour contained in sourdough
Wheat flour 1c - 200 gr. (40%)
Water until the dough has a medium consistency - 275-350 g, including the water contained in the starter
Instant yeast - 0.83 gr. (round up to 1 g or 1/4 tsp)
Salt - 7 gr.
Refreshment of sourdough:
According to the recipe, the baking percentage of rye flour in the dough added along with the starter is 33%. Consequently, the starter needs to be refreshed with the expectation that the final mass of flour in it will be 165 grams. (165 = 33% of 500 g - the total weight of all flour in the dough). Taking the humidity of the starter at 100%, that is, the amount of water and flour is equal, we get:
100 gr. sourdough with 100% humidity
138 gr. rye flour
100 gr. water.
You will get 338 grams of sourdough, which contains 196 grams. flour and 142 gr. water. According to the recipe, you need to take enough starter to add 165 grams to the dough along with it. flour. That is - 284 gr. the leaven will go into the dough.
Allow the starter to ferment for 6-8 hours.
Dough:
284 gr. refreshed sourdough
135 gr. rye flour
200 gr. wheat flour 1c
160 - 230 gr. water until the dough has a medium consistency
1 gr. instant yeast
7 gr. salt
Measure out the minimum amount of water (the water should be warm) and dissolve the yeast in it. Pour the yeast water into the starter and stir thoroughly (you can gently whisk it with a whisk). Mix rye and wheat flour and pour into liquid starter. Mix the dough with a spatula, adding water as needed until the flour is completely moistened. Cover the bowl with cling film and leave the dough for 30 minutes.
Add salt to the dough and knead the dough. It is extremely uninteresting to knead such dough by hand; it is better to use a mixer with hook attachments. 5 minutes on medium speed to ensure smooth dough, then 8-10 minutes on high speed. The dough will come together into a sticky, but not too sticky, ball and will scrape down the sides of the bowl or bowl. Round the dough ball and place it in a greased bowl to ferment. Cover with film and leave to ferment at T=30C, for example in a microwave oven with a cup of boiling water. Fermentation - 90-100 minutes. I didn’t give the test any warm-ups. The dough will not grow much during the fermentation process, but will become very soft and pliable, like a drunk schoolgirl at prom.
Grease the bread pan with vegetable oil, or even better.
Spread the finished dough onto the work surface into an even and long tongue. Roll it into a roll, carefully roll the seam (the dough is very soft), shape it into a log and place it in the mold, seam side down. Cover with cling film and leave to rest at room temperature for 45-90 minutes, depending on the temperature.
Before placing the bread in the oven, grease the surface of the bread with water or starch mash (1 teaspoon of potato starch per 100 grams of water).
Bake at 240-220C for 45-55 minutes, with steam in the first 15-20 minutes of baking. Then ventilate the oven, reset the temperature to 220 and finish baking.
Spray the top crust with water before removing from the oven. If you grease with starch before baking, this is not necessary; the crust will not crack.
Allow the finished bread to cool directly in the pan for 10-15 minutes, covered with a damp towel, then transfer to a wire rack, cover with a towel and cool completely. Let the bread sit (ripen) for several hours before eating. I bake in the evening and leave the bread on the rack overnight.
See, he’s smiling, the rascal!